
Like a lot of people, I’ve found that my TV viewing habits have moved away from broadcast TV and towards streaming services such as Netflix and Amazon Prime. I decided it was time to have a cold hard look at how much I was spending on my TV subscription and take the brave first step to becoming a cord cutter – I phoned my Inernet Service Provider and cancelled.
My ISP sent me a fantastically designed self-assembly box in the post to mail the set top box back to them. As I packed it away, I thought that I wanted to still have access to live TV – just without being tied down in an expensive contract. I considered a few Freeview (a free DVB-T service in the UK) boxes, but it would be much more fun to build something myself. So that’s what I did.
For my TV, I wanted the following features:
- Watch live TV
- Watch a live broadcast while recoding another (or record two at once)
- Schedule recurring recordings for all episodes in a series
- Stream Recordings to an iPad on the same network
Hardware
For the hardware of my TV recorder, I used a 2GB Raspberry Pi 4 – this should be powerful enough to handle recording and playback of video files. Its super small and easily connects to my hifi using HDMI. During early testing, the Raspberry Pi got extremely hot, and while I never observed any stability issues or slowdowns, I installed a passive heat sink on it to help out.
To actually tune to the broadcast, I used a Hauppauge WinTV-dual HD TV tuner connected with a small USB cable. This includes two DVT-T and two DVB-C tuners in a convenient stick form factor. In the box with the tuner, there was a small antenna to use when you’re on the go. I left this in the box and plugged the tuner directly into my roof antenna to get a better signal.
Also included with the WinTV stick was a credit card sized infrared remote control to use with the included WinTV software. As I already had a Logitech Harmony setup, I chose not to add an IR receiver to the Pi – instead I set up the Raspberry Pi as if it were a Windows machine in the Harmony app and connected to it using Bluetooth. This works really well – when I switch to the TV, the Harmony connects as a Bluetooth keyboard and I have full remote control (including text input).
Rather than buying a very expensive SD card to store all the recordings, I wanted to use an external hard drive. As performance was not a massive issue, an SSD was not needed and I already had a spare 500GB mechanical drive spare. I bought an Amazon Basics Hard Drive enclosure and connected this via USB to the Pi. This was problematic though, as both the Raspberry Pi and the external hard drive are quite power hungry and exceeded the total power draw of the power supply. This caused the device to struggle to boot up with the hard drive ticking and the Pi logging a lot of low voltage errors.
To fix this, I added a powered 7 port USB hub, that can supply enough power for the hard drive. I power the Raspberry Pi off this, too, so the whole system only has one power connection in the wall.
Finally, I took this whole arrangement and tied it together as one unit using zip ties. It is currently hidden out of sight behind the TV. Going forwards, I want to build this into a more attractive case. I considered 3D printing something, but it is too large for my print volume, so I’m currently on the lookout for a broken set top box that I can remove the innards and replace with this device. I haven’t found anything that meets my needs yet, but I do have a broken original Xbox in the garage that is a tempting idea.
Software
With the hardware built, it was time to move on to the software. For this project there was no need to custom write anything, as there are already some excellent open source projects in the community.
For the management of the TV side of the device – responsible for tuning to live TV and scheduling & playing recordings – I used Tvheadend. Tvheadend can be installed on any device on the network, as it is controled though a simple API and supplies the live TV or recoding as a video steam. In my case, I installed it on the same Raspberry Pi that I connected to the TV, and accessed it though localhost.
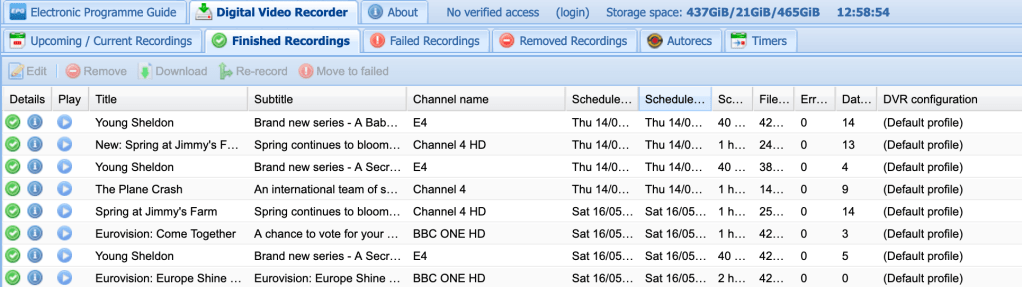
The advantage of Tvheadend working in this way is that you can also make use of the iPad app to stream both live TV and recordings. I use this so I can watch recordings in the kitchen while cooking – which is probably my favorite feature.

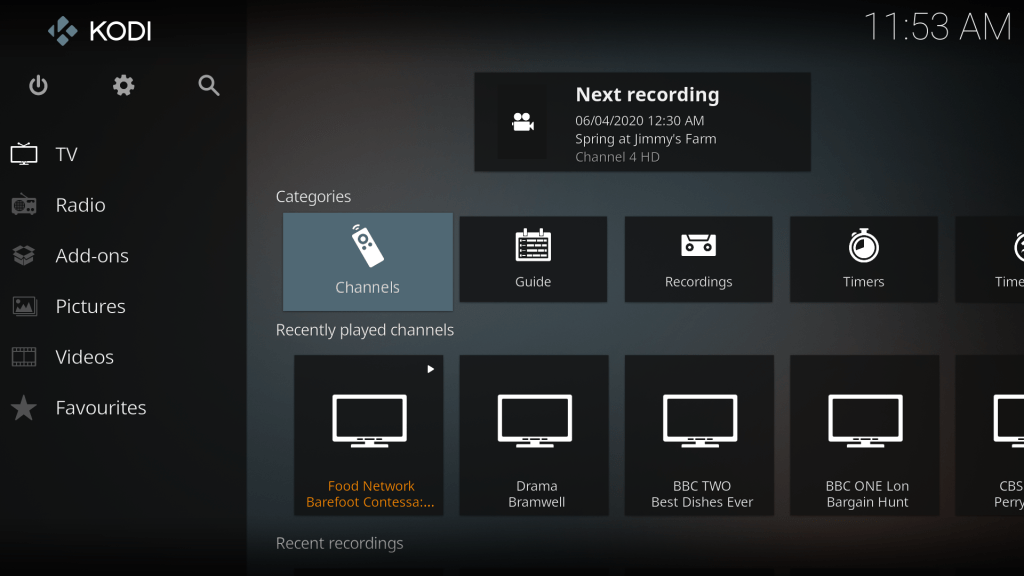
As a front end for the system I used Kodi – installed via the LibreELEC Raspberry Pi image.
Previously known as Xbox Media Centre, due to its heritage running on original Xboxs, Kodi provides a friendly and easy to use TV sized interface. From the addon repository, I added the Tvheadend plugin that lets me control the Tvheadend service though Kodi.
Review
Building your own TV recorder this way is not for the faint hearted. While it seems like a simple job of putting all of the pieces together and pressing the power button, it has involved some in-depth configuration and an awful lot of deeply frustrating troubleshooting. Here’s a rundown of some of the headaches along the way:
- Tvheadend has a lot of options – Setting up authentication can be a little confusing, as can the DVR configuration. While it does have documentation, I frequently found it to be stale – referring to buttons or options that had moved or no longer available. Often figuring something out can involve some searching and reading forums.
- The sound kept breaking – I’d boot up and watch a TV show, no problem – then I’d come back later and there would be no sound until I rebooted. Eventually I tracked this down to a configuration option on the Raspbery Pi, where it does not output a HDMI signal until it detects a connected device. I changed this to force output even if no device is connected (or it is off) and I’ve had no issues since.
- The TV kept turning itself on for no reason – I’d be minding my own business, and the TV would turn on all by itself. To resolve this, I disabled the HDMI CEC plugin for Kodi.
- Sometimes there would be artifacts at the top of the screen – Some TV shows had a black line at the top of the screen that flickers during playback. I think this is related to how subtitles are encoded on SD TV and subtitles, but to resolve the irritation for me, I set a 1 pixel overscan on the picture so I couldn’t see it.
- Live pause doesn’t work – Or more specifically, after pausing when you press play again, playback fails and you have to restart playback. I’m still investigating this; I’ll update ether article if I find a fix.
- Tvheadend doesn’t always start on bootup – I ran into a lot of issues where Tvheadend would not boot properly and no TV sources woud be available. I resolved this by adding a delay in the Kodi config before it attempts to start the Tvheadend service – this allows everything to get ready first.
Wrap Up
Generally, I’m pretty happy with my TV recorder – with the streaming options and the apps, it provides features that are only available on much more expensive subscription services. Tinkering with the settings to get it to work, while a little frustrating, provided a few evenings of entertainment during lockdown (although when you sit down to watch a movie and end up fiddling with your config for an hour instead, “entertainment” may be a generous description).
I already had some of the parts available to make this, but if you were to buy everything needed from scratch, this isn’t a cheap way of getting a TV setup – you can get pre-made set top boxes for less. But they don’t have as many features and where is the fun in just plugging it in and watching TV?
Feedback
I hope my little writeup of how I made my TV recorder was interesting, if you have any feedback or have tried something similar, drop me a comment or a tweet on Twitter.
