In my last post I mentioned that I also wanted my info display to show the current indoor temperature, read from the air quality monitor that I made. I built the air quality monitor a couple of years ago – it was my first experience playing with an Arduino and was a lot of fun (interspersed with moments of utterly frustrating confusion). I thought I’d put together a quick intro to what it does and how I made it.
Why Build An Air Quality Monitor?
I saw an advert for an attractive little box that you put on a shelf that monitors the air quality in your room. It has an app to view the data and send you push notifications if it the air was too unhealthy. I loved the idea – I’m a big tracker of data (I once had to log of every single ingredient of every single product I ate for an entire year) and thought it would be really interesting to find out what my environment in my house is like.
I considered buying it… I really did. Then I decided I could totally build my own. I started by buying some sensors:
- Adafruit BME280 – This is a Bosch BME280 sensor on a Adafruit breakout board, it can sense humidity, barometric pressure and temperature
- ams iAQ-Core P – This sensor measures combined Volatile Organic Compounds and CO2 levels.
I2C Lessons
I hoped I could make use of the hardware I already had and use a Raspberry Pi to read data off these sensors, but as I dug in I started learning some interesting things about the protocol they use to communicate – I2C. This uses a clock signal driven by the host device communicate with all devices on the bus.
The speed of this clock is largely arbitrary, however if the host clock is ticking too fast, such that a device on the bus cannot do sufficient work within each cycle it can use a process know as “clock stretching”. This allows the sensor to delay the next clock edge until it is ready.
However, there is a well documented bug in the Broadcomm BCM2835 used in the Raspberry Pi (as well as the multi-core processors derived from the BCM2835 found in newer Pis). This bug prevents clock stretching from working correctly – meaning devices that rely on it can fail to operate correctly or return corrupted data.
There are some workarounds – there are some software-only “bitbanging” implementations of I2C that should support clock stretching, its also possible to set the Pi’s configuration so that the bus speed is slow enough that the clock is never stretched. I opted to try the latter, and two infuriating hours of reading garbage off the iAQ-Core later, went into town and bought an Arduino Uno from Maplin.
Arduinos, Big and Small
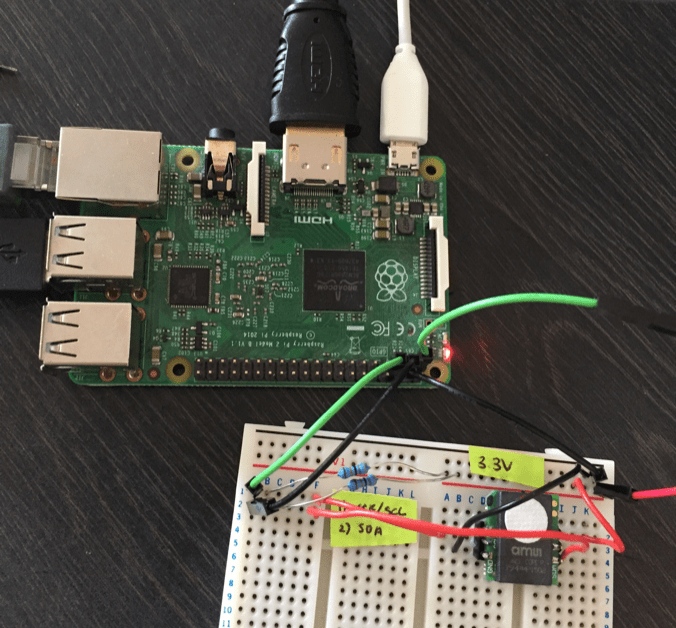
Using the Arduino worked perfectly, and I was now able to read data off the sensors and print it to the console. So to get it working as quickly as possible, I wrote an Arduino sketch that would listen for newlines on the serial connection, then write out the sensor values as a JSON object. I used a Python script on the Raspberry Pi to send the new line, parse the result and log it.
The Arduino Uno runs as 5V logic, while the Raspberry Pi runs at 3.3V logic – this wasn’t an issue for the BME280 sensor as its Adafruit breakout board is built to handle either, but the IAQ-CORE is 3.3V only. I added a logic level sifter from eBay to fix this, I was very pleased with how well this worked at very reasonable price.
For nine months, that’s how it stayed. A Raspberry Pi 2, with a giant USB cable leading to an Arduino Uno, in turn connected to an unholy tangle of sensors on a breadboard. Every time I sat at my desk, I’d knock one of these cables and cause it to crash.
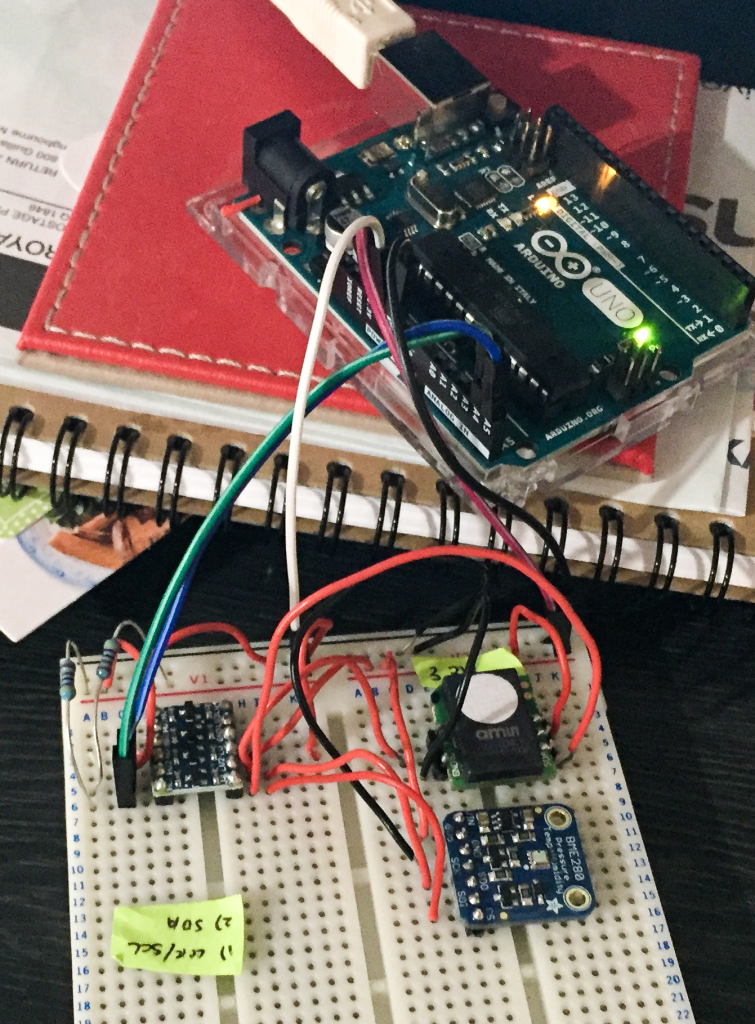
I resolved to tidy this up and pulled the whole thing apart and started soldering it together permanently (I mounted the sensors on headers so I could remove them easily if I ever wanted to cannibalise the parts for another project), swapping the Raspberry Pi 2 for a Zero W and the Arduino Uno for an Arduino Pro Mini. I soldered the Raspbery Pi and Arduino’s UARTs together so they could still communicate with the blank line / JSON object arrangement. At the time I was doing this, I could only get the 5V model of the Arduino Pro Mini, so the logic level shiftier is still present in the “finished” product.

Logging The Data
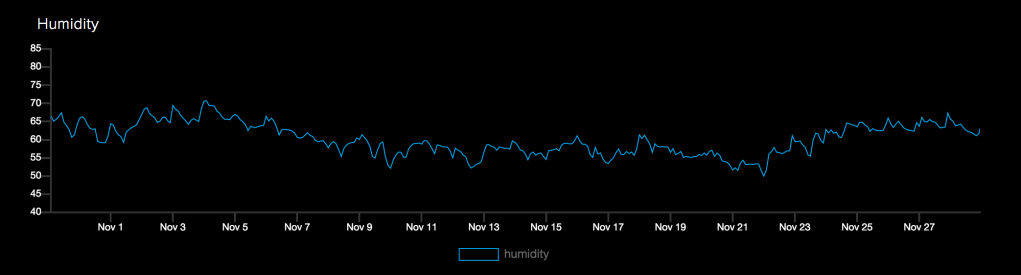
The air quality monitor takes a reading of the temperature, humidity, pressure, total volatile organic compounds and CO2 every 30 seconds, and uploads it to Adafruit IO. I can then create pretty dashboards:

Putting It in A Case
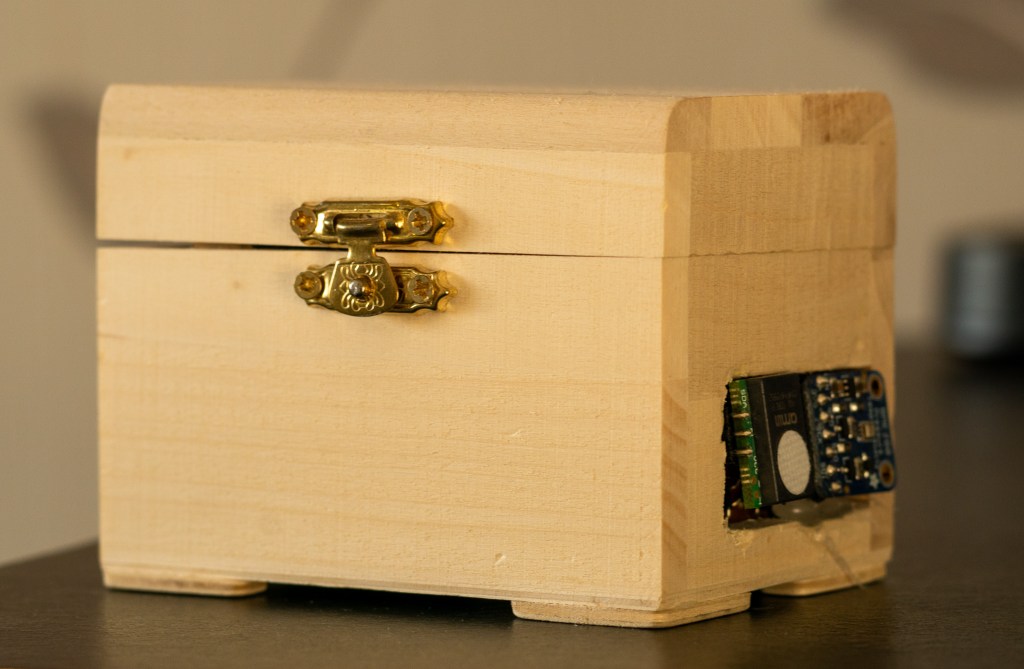
The next thing to do was put the assembled circuitry in some kind of enclosure. I spent a while looking on eBay for a nice clock – maybe a Westminster Chime mantel clock – that I could stuff it all inside. I’m still looking for the right clock to for my room, but in the meantime I found a small wooden box in The Works. I cut a hole in the side of it for the sensors to stick out of and hot glued everything inside.
Its, perhaps, not the most attractive solution possible, but its a heck of a lot better than all the bare wires just sitting on a shelf.
Adding a Screen
For my birthday I was given a little Adafruit OLED screen which I soldered into the I2C bus used by the sensors and updated the software to display the current temperature.
What Now?
This was very much a learning experience, but I have some plans for a V3 monitor:
- Replace the Arduino / Raspberry Pi arrangement with some kind of one-board solution. Perhaps a Adafruit Feather
- Build / buy some kind of nice case to store it in
- Possibly merge the hardware into the back of the eInk display so it is only one device.
- Loose the logic level shifter and make the whole device much smaller
- Track other metrics. I’d be fascinated to track background radiation, maybe?
Code
For reference, I’ve published all of my code for this project to my GitHub. I intended this mostly as a reference as to how it worked. So unless you built the exact same project, it wouldn’t work without some modification.
If this is helpful or inspires you to build something you of your, I’d love to hear about it. Make a comment or tweet me @andycb.

Have a look at Node-RED (dashboard) and Home Assistant. you can create displays like that running NR or HA on a local Raspberry Pi so you do not need a ‘cloud’ service. A lot of home automation addicts do not like ‘cloud’ services because they are a step away from ones own ultimate control and system security.
Also so for ideas have a look at Peter Scargill’s technical blog, if you have a few days to spare!
LikeLiked by 1 person
Nice recommendation with Peter Scargill’s blog :).
I find myself in two minds when it comes to running locally vs cloud services. On the one hand having everything in-house is a more interesting challenge, more flexible and I know exactly where my data is. On the other, its another thing for me to maintain, update and generally look after and there’s something to be said for outsourcing that.
Mind you, I am running up against some of my feed limits for the cloud services, so I am investigating all my options here 🙂
LikeLike