This post is for information only. It is not a guide. Do not try this yourself. If you ask for help, I will not be able to give it.
Before the pandemic, when we started working from home, I used to make coffee a number of different ways, depending how I felt. I liked to experiment – sometimes I would use a V60, others a French Press, coffee syphon or espresso machine. This worked well on the weekends when I had time to experiment a little. However, when you need to grab a quick coffee between meetings, it turned into a real faff; there’s just no matching the convenience (if not the quality) of the office coffee machine.
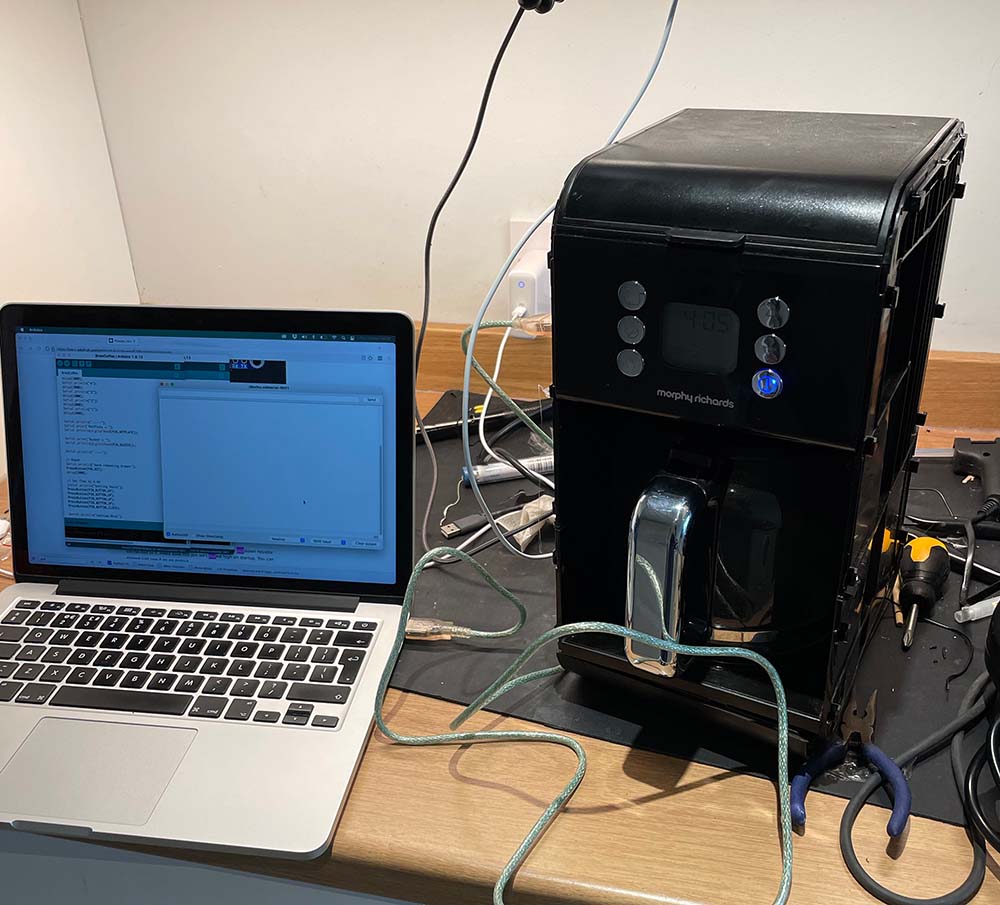
My solution here was to pick up a Morphy Richards Verve filter coffee maker that I could leave running while I went about my work and come back to when it was done. I was really surprised with this machine, I was expecting to sacrifice a lot of quality for convenience, but with a little fine tuning on ground size and water quantity, its capable of producing some very drinkable coffee.
Occasionally, though, I would get it brewing and forget to go back to collect the drink, leaving it going stale on the hot plate so I decided to see if I could connect it to my network for notifications and control.
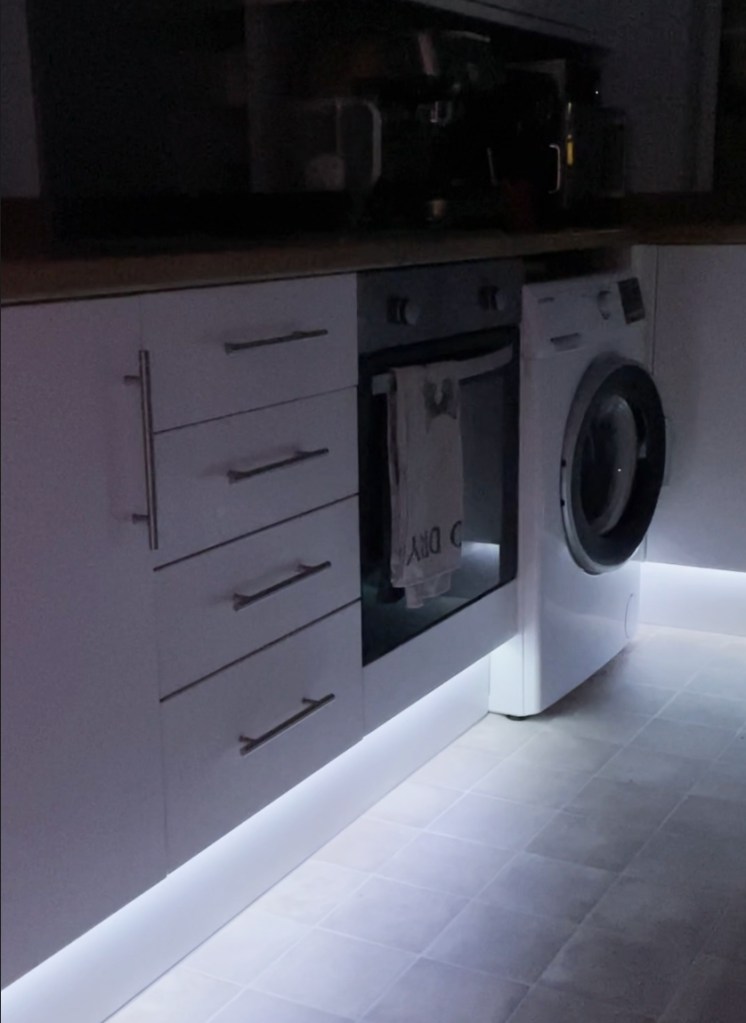
My kitchen has some pretty bright spotlights in it, but they’re only in use when you’re working in there – once you turn them off and leave, the room can be very dark and its kind of depressing when you walk past it. I wanted to add some warmth by putting some soft under cabinet lighting.
I started in the Amazon end of summer sale by picking up the cheapest RGB strip lights on offer. I was a little worried that some of the reviews mentioned that the power pack was a a bit suspect and had exploded for a few people, so I decided to use an old generic laptop adapter I had lying around. I measured the power draw of the full 10m of lights to make sure it was powerful enough for the job.
The lights I bought came with an IR remote to control the brightness and colour, but I wanted to be able to control them though Home Assistant. I connected them up to a Shelly RGBW2 controller.
Because of the layout of the cupboards, I needed to fit the lights in several strips, so I bought some strip connectors from eBay, as well as an RGB strip extension cable, that I used to connect the sections together in series.
A couple of months ago, I put a film in my Pentex ME Super, took some photos and then got distracted for a little while. In that time, the box end on the camera back slipped out and I totally forgot what was in it.
When I returned to shooting, I assumed that the film must be Ilford HP5 plus – what I normally use – and went out to take some photos. Unfortunately, on rewinding the film, I realised that I’d made a mistake – the Film was not HP5, but Kodak ColorPlus 200.
This was disappointing because I was partially looking forward to seeing some of the photos I had taken in black and white. I guess I could have the film lab developed in colour and convert to B&W in Photoshop, but that feels wrong somehow.
That’s when I discovered, that not only had I been using colour film thinking it was B&W, but I had the camera set to ASA 400, when this was a 200 film, so now I have an entire underexposed colour film that I wish was black and white.
I contacted a couple of labs to ask if they could push process a C-41 film with no luck, I considered just having it developed at box speed and trying to fix in photoshop. I decided, though, to use this as an experiment and learn something from it (other than to pay attention to what you’re shooting with). I’d heard that you can cross process C-41 film in black and white chemistry, but searching seemed to indicate about as many people saying it hadn’t worked as had.
Then I came across this post, where the author used both the same film stock and developer as I had. In the post he had used the average development times for black and white film. I decided to do the same, developing at low temperature and doubling my normal development times from 6:20 to 12:40.
I also wanted to push process this film to compensate for my incorrect camera config, to do this I combined the “double it” approach from above, with a rule of thumb I remember reading once of “one minute per stop”, and added two minutes for a total development time of 14:40 minuets.
Nine months ago, I upgraded my car to a new Volkswagen Golf 8, and I thought it was time to put together some of my thoughts so far.
I bought the car myself, with my own money, after an extensive search of multiple manufactures. VW had no editorial input into this review, nor have they seen it before publication.
My specific car is a Golf 8 Style with the 150HP Petrol TSI engine and manual gearbox. It is in Atlantic Blue with the following factory fitted extras:
Winter Pack – Heated front seats, heated steering wheel and three zone climate control.
Reverse Parking Camera – Camera Hidden in the rear VW logo shows you the area behind your car when reversing.
Park Assist – Allows it to automatically parallel park or reverse into perpendicular parking spaces.
Dynamic Chassis Control – Allows the car’s handling to be controlled by the driver’s selection.
Variable steering – Changes the steering ratio based on speed and driving profile.
Spare wheel – Adds a space saving spare wheel in place of a puncture repair kit.
Keyless entry – Allows the doors and boot to be unlocked with the key in your pocket, by lightly touching the door handle.
Mobile key – Allows a phone to be used in place of the car key (currently supports a small number of phones)
Purchase Experience
I bought my car in person (between lockdowns) at a local VW agent. While much of my experience will be specific to the agent rather than the Golf or VW, they are the franchise of choice for VW and form an important part of the end customer experience.
I found the experience to be a bit of a mixed bag; On entry, not knowing what I was looking for, I was very impressed with the no-pressure way that the agent showed me the range, listening to my thoughts, and helping me understand the differences.
When I moved into my house, it came with this and old fan in the bathroom to keep the moisture down when you’ve had a shower, the bathroom itself is in the inside of the building and doesn’t have any external walls / windows, so the fan is really important to keeping it dry and non-moldy.
The original extractor worked well enough, but I’ve never really been that happy with it; it’s kind of noisy when running at full speed and has a trickle mode that runs it at low speed all the time – ostensibly this is to keep the room fresh, but in reality, means that the room Is always cold in the winter. It’s also not very well installed – is the case not fully closed on the fan focusing, and when I tried to close it up tightly the fan scraped the inside of the case and made an awful noise.
More recently the humidistat that makes it speed up automatically stopped working, meaning that after a shower the room would stay damp for hours afterwards. I’ve tried taking the fan apart and cleaning it in case it was just dust and grime of the sensor. But that didn’t help, so I set about replacing it. This being 2021 with nothing better to do, I decided to make it smart and control it from software.
After some research, I used a Manrose MF 100T inline fan, looking down the spec sheets, it is quieter, more electricity efferent and moves more air than the existing solution so seems like a great fit.
To control the fan, I used a Shelly 1 relay – I’ve used some Shelly 1 PM relays in a couple of other places that I’ll write about soon, and I’ve so far been super happy with their ease of use and reliability.
Software engineering is a very broad profession with many different types of work you can do, each with their own opportunities and challenges, but have you ever wondered what those opportunities are? Perhaps you’ve feel your work isn’t challenging you enough, or you’re not motivated by what you do.
In this article, I want to take you though some of the different places software engineering can take you, and what the opportunities, challenges and rewards are for each of them. Hopefully by the end you will be more equipped to understand the challenges and opportunities available to you and how you can shape your career choices around what excites you.
Front End & Back End?
You’re probably familiar with the split into “frontend” and “backend” engineering, you’ve possibly seen somebody exclusivity describe themselves as a frontend / backend engineer.
Separations like this are a good start, and we tend to think we have a pretty good handle on what they mean, but I don’t think they tell the whole storey. This separation makes the assumption that each of these categories is a fundamentally different role. However, the core challenge and activities in all of these roles is the same; you’re using your creative human brain to find solutions to problems and convert those solutions into code.
Or as a former manager of mine put it…
The biggest difference between front and back end development sits in two areas: The tools used to do your job and the problems you will be solving. Let’s dig into each of those a little deeper to see how they can effect the work you do.
Tools
No matter what you do, you probably use some kind tools, and those tools will be highly specialised to the task you are doing. For a mechanic these tools may looks like wrenches, screwdrivers or diagnostic devices. But for a software engineer these are more like the programming language, operating system, development frameworks and even development methodologies.
But here’s the thing: You are not your tools.
These tools exist to help you get your job done and may be different depending on what that job is. You shouldn’t allow yourself to become limited or defined by the tools you use. You chose them, you learned how to use them, but they are but an artefact of the problem you are solving not the definition of what you do.
The Problems Being Solved
The other difference is the actual problems you are trying to solve – the challenges you are facing on a daily basis. I’ve heard a lot of engineers over the years talk about how they don’t feel like their project is providing them with “real challenges”.
For developers who work on the front end, this can often sound something like “all I do is call and API and render it on the screen; I don’t do any ‘real engineering’”. Whereas on the other side it can sound like “All I do is manipulate data and pass it to the UI; I’m too far from the real code that the user sees”.
Often when feeling this way, there is challenge available to them – but it’s not challenge that excites them, it’s not work that motivates them to get out of bed in the morning and go to work.
If this sounds like you, perhaps you too are not solving challenges that motivate you. Understanding what challenges are available in different roles and knowing which ones inspire you most will empower you to make the right next move in your career (weather that be a new job, or a discussion with your manager to ask for different activities).
The Challenge Spectrum
So, it seems that a traditional frontend vs backend definition is not enough to articulate the different choices you can make to position yourself in a place to solve exciting problems and do your best work. Instead, I want to introduce you to the Challenge Spectrum.
The Challenge Spectrum spans from data & platform challenges to human & interaction challenges, taking in all possible roles you can occupy along the way, all of them as just important as the others. At several points along the spectrum, Ive annotated some example challenges you may face at that location.
It’s been a little while since I first started building IoT gizmos for my house and I’ve continued to improve and add to them so I thought it was a good time for an update on how some of the projects have fared, what’s new and what I’m thinking of for the next year.
2020 has been one hell of a year – My team and I have been lucky enough to be able to continue working from home and even managed to ship some products along the way. However, spending so much more time at home has caused me to spend more time thinking about my environment. Small irritations are magnified into daily hassles and new issues present themselves, giving opportunities to optimise my work from home life with more projects.
Smart Heating
Back in February I wrote about how I had modified my central heating be smart without damaging the property or replacing any of the components. This project was my first adventure into 3D printing and the ESP8266.
A year on, the system is still installed and running my heating on a daily basis. I am very pleased with how well it’s worked with only a few changes:
Missed MQTT messages – In the first few weeks, there were a few occasions where the heating would not turn on or off when instructed. When I investigated, it seemed that MQTT messages would not always be sent to the device when published. To work around this, I added code that forcibly checked the state every 10 mins and would perform the missed action if needed.
Restore previous state – In the original version of the project, the device would take the latest value published to the MQTT feed as the source of truth. However, this was problematic as if a new message was published while the device was not available for some reason, it would run out of sync – meaning that the heating would turn off then instructed to turn on and vice versa. To fix this I used the ESP8266’s SPIFFs storage to store the current state of the heating toggle and restore it after device restart.
Timing – The timing to switch the heating on and off is no longer powered by IFTTT, instead it is now powered by automations in Home Assistant, which allows me to create more complex programs.
Digital TV Recorder
In May I wrote about how I used Kodi and Tvheadend to build a TV recorder. This is still running and recording TV shows. I’m very happy that I can stream its recording through my home and watch them in the kitchen while cooking. I’m also really happy with the massive saving I’ve made by cancelling my paid TV contract. It’s not been without it hiccups though:
Live Pause – For some reason pausing live TV does not work as expected. I can pause and restart the broadcast , but a few seconds after restarting, playback fails and cannot be resumed. I don’t really watch much live TV, so I’ve not yet been sufficiently annoyed to investigate this.
Start-up Issues – On bout 50% of start-ups, Tvheadend fails to start and cannot be used. To resolve this, I have to manually stop and restart the service. I haven’t yet looked into what is causing the issue, but its high on my list.
Living Room eInk Display
The living room info display continues to function, and I use it a lot to know if it will rain when going out. However, with Apple’s acquisition of Dark Sky and subsequent deprecation of the API, I will need to update it at some point in 2021 to use some other data source. If you’ve any good suggestions of where to get similar information for, I’d love to hear them in the comments or on Twitter.
I was pleased with how neat this new version was when in a nice 3D printed box. I was very happy with its crazy low power consumption between air quality samples every five minutes. However, it has an issue – the temperature & humanity sensor is too close to the gas sensor, meaning that it suffers crazy self-heating to as much as 10c, which made its data very unreliable.
It still works as a volatile organic compound sensor, but I will need to re-think the board layout to get reliable data from the temperature and humidity again.
Home Assistant
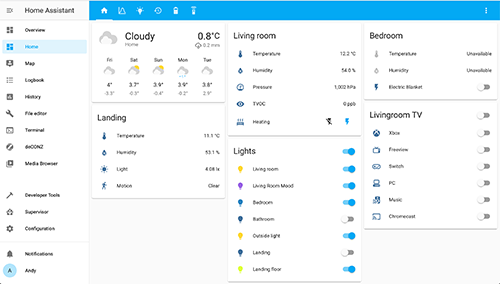
Over the year, I added yet another Raspberry Pi to my home, this time running Home Assistant. I’ve been really pleased with the power of automation I’ve set up with this. I’ve used it to automatically start the Roomba if I leave the house between certain times, automate the outside lighting and provide more powerful timing to the smart heating project.
I also added a Conbee Raspbee II to the Raspberry Pi, to allow it to communicate with Zigbee devices. I now have a Xiaomi temperature sensor in every room and a set of Ikea Trådfri lights in the bathroom. Eccentric as this may seem, its allowed for some really nice and inexpensive luxuries – such as turning the on heated blanket in the bed before bedtime if it is cold in the bedroom or adding mood lighting in the bathroom when you want to relax in the bath.
2021
I’m pretty pleased with some of the things I did over the last year, but I’m looking forward to building some even more cool things in 2021 and sharing them with you.
With working form home continuing to be necessary for the time being, I want to focus on improving my environment to keep it fresh, interesting and comfy as well as dealing some of the pain points while working. I’m going to be adding a lot more automations with Home Assistant as well as building out my smart lights through a const effective use of Hue and Ikea lights.
If you have any cool suggestions or ideas that you think I might be interested in, drop me a comment below or on Twitter.
Hope you have a great 2021! (Or at least a better one than 2020)
A little while back I wrote about how to use Cura with the Monoprice Voxel / FlashForge Adventurer 3, in that article I discussed how to create a printer profile and slice your models to produce a G-Code file. However, without using the bundled FlashPrint software, it was not possible to transfer the file over the network – instead needing to use a USB flash drive.
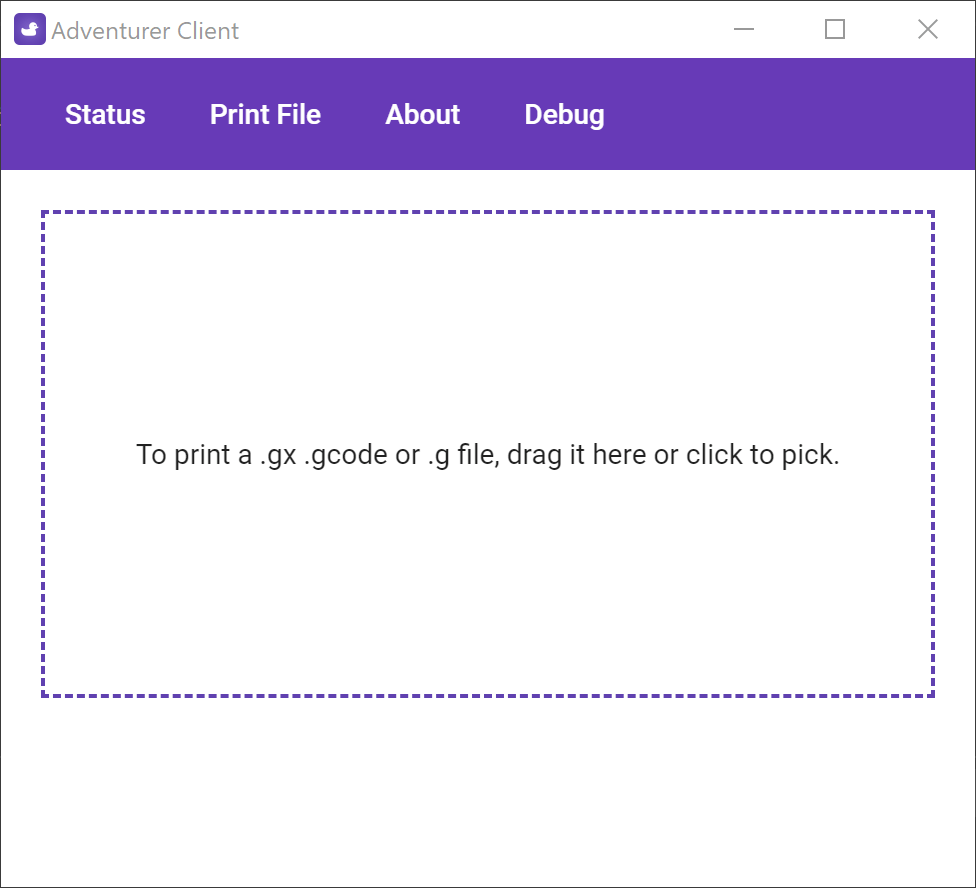
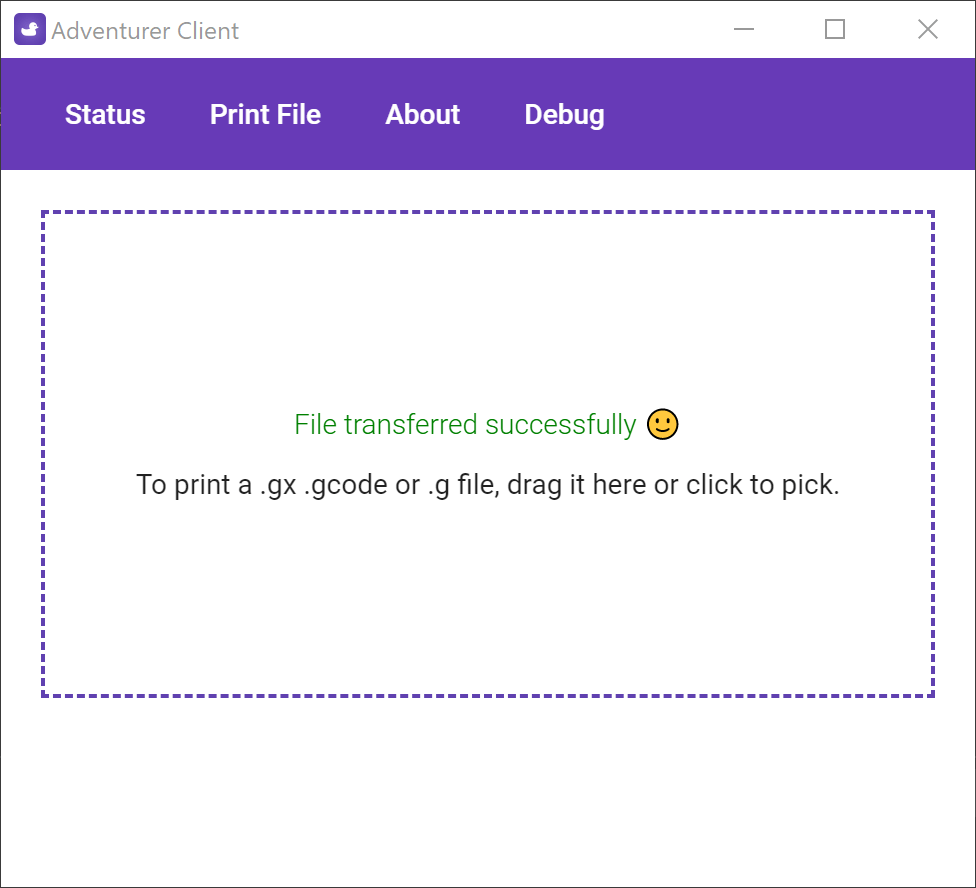
I wanted a lightweight app I could use to transfer files to my printer, so I’ve spent the last few weeks I’ve been building Adventurer Client to do just that. I wanted to use it as an opportunity to learn some new frameworks / technologies and I had a lot of fun building it. I thought it would be useful for other FlashForge & Monoprice users too, so now I’m ready to share it with you all.
Using Adventurer Client, you can connect to the printer, see its state and transfer already sliced gcode files to the printer.
Printer Compatibility
I’ve tested this with a Monoproce Voxel, which is a rebranded FlashFordge Adventure 3, I believe this will work with other FlashFordge Printers too, but I don’t have access to any to test this. If you try the app with your printer and it works (or does not) please let me know 🙂.
Getting the App
Windows 10
If you’re running Windows 10, the easiest way to get the app is to instal it from the Microsoft Store here.
Windows 7, 8 & 8.1
To install the app on older versions of Windows download the installer (AdventurerClient-win.exe) from the lastest release here.
MacOS
To install the app on older versions of Windows download the macOS dmg (AdventurerClient-mac.dmg) from the lastest release here.
“Adventurer Client” cannot be opened because the developer cannot be verified.
Unfortunately, Apple requires that software running on macOS be signed and notarized so that they can verify its identity. Doing this would require me to buy an Apple Developer license which is quite expensive. Therefore, for the time being, the app is distributed unsigned (if I buy a developer license later on, I’ll submit this to the App Sotre). To run the app you need to perform the following steps, for the first run only.
Double click on “Adventurer Client”
At the “Adventurer Client” cannot be opened because the developer cannot be verified. message, click cancel
Right click on the app and click open
At the macOS cannot verify the developer of “Adventurer Client”. Are you sure you want to open it? message, click Open
Tech Details
I’ve published the app’s source under the MIT license on my GitHub. In order to easily support running on both Windows and Mac, it is implemented as an Angular app in an Electron wrapper. I was larning a lot about these technologies as I went, so if there are things that seem odd, your feedback (or pull requests) would be warmly welcomed.
Feedback
I this app is useful to some people, I plan on continueinf to tinker with it over time. If you have any feedback or suggestions, drop me a comment or a tweet on Twitter.
Like a lot of people, I’ve found that my TV viewing habits have moved away from broadcast TV and towards streaming services such as Netflix and Amazon Prime. I decided it was time to have a cold hard look at how much I was spending on my TV subscription and take the brave first step to becoming a cord cutter – I phoned my Inernet Service Provider and cancelled.
My ISP sent me a fantastically designed self-assembly box in the post to mail the set top box back to them. As I packed it away, I thought that I wanted to still have access to live TV – just without being tied down in an expensive contract. I considered a few Freeview (a free DVB-T service in the UK) boxes, but it would be much more fun to build something myself. So that’s what I did.
For my TV, I wanted the following features:
Watch live TV
Watch a live broadcast while recoding another (or record two at once)
Schedule recurring recordings for all episodes in a series
Stream Recordings to an iPad on the same network
Hardware
For the hardware of my TV recorder, I used a 2GB Raspberry Pi 4 – this should be powerful enough to handle recording and playback of video files. Its super small and easily connects to my hifi using HDMI. During early testing, the Raspberry Pi got extremely hot, and while I never observed any stability issues or slowdowns, I installed a passive heat sink on it to help out.
To actually tune to the broadcast, I used a Hauppauge WinTV-dual HD TV tuner connected with a small USB cable. This includes two DVT-T and two DVB-C tuners in a convenient stick form factor. In the box with the tuner, there was a small antenna to use when you’re on the go. I left this in the box and plugged the tuner directly into my roof antenna to get a better signal.
Also included with the WinTV stick was a credit card sized infrared remote control to use with the included WinTV software. As I already had a Logitech Harmony setup, I chose not to add an IR receiver to the Pi – instead I set up the Raspberry Pi as if it were a Windows machine in the Harmony app and connected to it using Bluetooth. This works really well – when I switch to the TV, the Harmony connects as a Bluetooth keyboard and I have full remote control (including text input).
Rather than buying a very expensive SD card to store all the recordings, I wanted to use an external hard drive. As performance was not a massive issue, an SSD was not needed and I already had a spare 500GB mechanical drive spare. I bought an Amazon Basics Hard Drive enclosure and connected this via USB to the Pi. This was problematic though, as both the Raspberry Pi and the external hard drive are quite power hungry and exceeded the total power draw of the power supply. This caused the device to struggle to boot up with the hard drive ticking and the Pi logging a lot of low voltage errors.
To fix this, I added a powered 7 port USB hub, that can supply enough power for the hard drive. I power the Raspberry Pi off this, too, so the whole system only has one power connection in the wall.
Finally, I took this whole arrangement and tied it together as one unit using zip ties. It is currently hidden out of sight behind the TV. Going forwards, I want to build this into a more attractive case. I considered 3D printing something, but it is too large for my print volume, so I’m currently on the lookout for a broken set top box that I can remove the innards and replace with this device. I haven’t found anything that meets my needs yet, but I do have a broken original Xbox in the garage that is a tempting idea.
Software
With the hardware built, it was time to move on to the software. For this project there was no need to custom write anything, as there are already some excellent open source projects in the community.
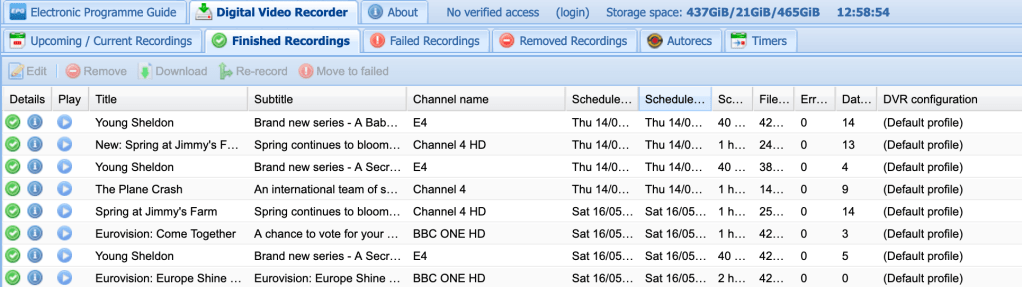
For the management of the TV side of the device – responsible for tuning to live TV and scheduling & playing recordings – I used Tvheadend. Tvheadend can be installed on any device on the network, as it is controled though a simple API and supplies the live TV or recoding as a video steam. In my case, I installed it on the same Raspberry Pi that I connected to the TV, and accessed it though localhost.
The advantage of Tvheadend working in this way is that you can also make use of the iPad app to stream both live TV and recordings. I use this so I can watch recordings in the kitchen while cooking – which is probably my favorite feature.
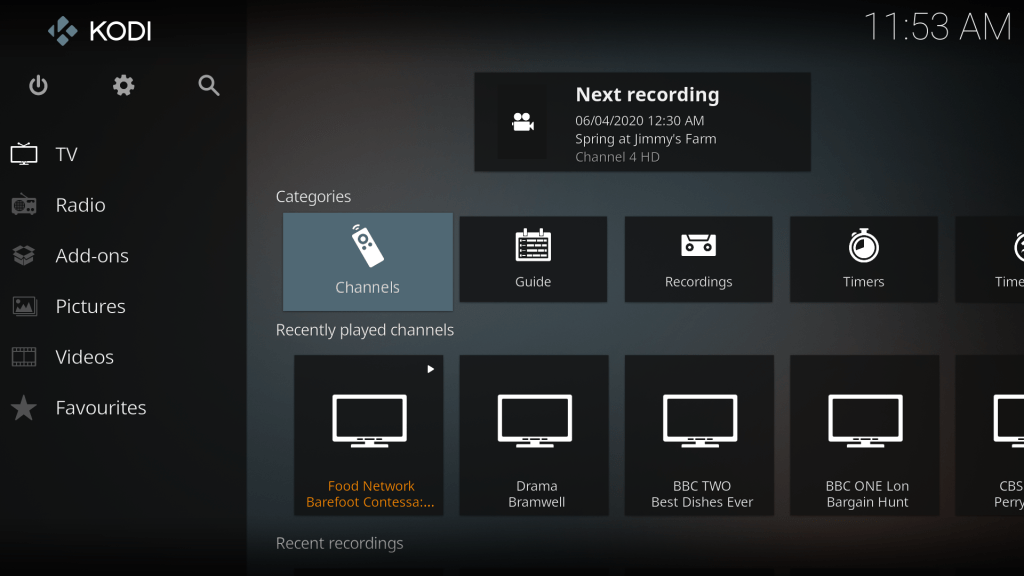
As a front end for the system I used Kodi – installed via the LibreELEC Raspberry Pi image.
Previously known as Xbox Media Centre, due to its heritage running on original Xboxs, Kodi provides a friendly and easy to use TV sized interface. From the addon repository, I added the Tvheadend plugin that lets me control the Tvheadend service though Kodi.
Review
Building your own TV recorder this way is not for the faint hearted. While it seems like a simple job of putting all of the pieces together and pressing the power button, it has involved some in-depth configuration and an awful lot of deeply frustrating troubleshooting. Here’s a rundown of some of the headaches along the way:
Tvheadend has a lot of options – Setting up authentication can be a little confusing, as can the DVR configuration. While it does have documentation, I frequently found it to be stale – referring to buttons or options that had moved or no longer available. Often figuring something out can involve some searching and reading forums.
The sound kept breaking – I’d boot up and watch a TV show, no problem – then I’d come back later and there would be no sound until I rebooted. Eventually I tracked this down to a configuration option on the Raspbery Pi, where it does not output a HDMI signal until it detects a connected device. I changed this to force output even if no device is connected (or it is off) and I’ve had no issues since.
The TV kept turning itself on for no reason – I’d be minding my own business, and the TV would turn on all by itself. To resolve this, I disabled the HDMI CEC plugin for Kodi.
Sometimes there would be artifacts at the top of the screen – Some TV shows had a black line at the top of the screen that flickers during playback. I think this is related to how subtitles are encoded on SD TV and subtitles, but to resolve the irritation for me, I set a 1 pixel overscan on the picture so I couldn’t see it.
Live pause doesn’t work – Or more specifically, after pausing when you press play again, playback fails and you have to restart playback. I’m still investigating this; I’ll update ether article if I find a fix.
Tvheadend doesn’t always start on bootup – I ran into a lot of issues where Tvheadend would not boot properly and no TV sources woud be available. I resolved this by adding a delay in the Kodi config before it attempts to start the Tvheadend service – this allows everything to get ready first.
Wrap Up
Generally, I’m pretty happy with my TV recorder – with the streaming options and the apps, it provides features that are only available on much more expensive subscription services. Tinkering with the settings to get it to work, while a little frustrating, provided a few evenings of entertainment during lockdown (although when you sit down to watch a movie and end up fiddling with your config for an hour instead, “entertainment” may be a generous description).
I already had some of the parts available to make this, but if you were to buy everything needed from scratch, this isn’t a cheap way of getting a TV setup – you can get pre-made set top boxes for less. But they don’t have as many features and where is the fun in just plugging it in and watching TV?
Feedback
I hope my little writeup of how I made my TV recorder was interesting, if you have any feedback or have tried something similar, drop me a comment or a tweet on Twitter.
I’ve previously mentioned that I wanted to upgrade my heating system so I could program it with more complex timings or control it form my phone. But there’s a catch: The house is rented, so the whole system must do no damage, be made only of removable parts and be installed without modifying any of the existing infrastructure.
In this post, I’ll talk about how I managed it, how it works and what the current state of the project is.
Background
My electric heating is controlled by a Timeguard RTS113 mechanical timer located awkwardly in a kitchen cupboard; it consists of a large outer ring that rotates once every 24 hours. On this ring, you push in red (on) or blue (off) plastic pegs (called tappets in the user manual) at the time you want the heating to turn on or off. As the peg passes a control spindle (representing the current time in the bottom right) it pushes it around approximately one eighth of a turn. Each eighth of a turn of the control spindle, toggles the heating on or off.
A second inner ring allows you to suppress the morning or afternoon schedule for a given day in the week. For example, you can have the heating come on at 6:00am and 7:00pm every day, except on Saturdays where it does not come on at 6:00am because the morning schedule is suppressed.
This works reasonably well, but it’s not very flexible – you pretty much a to live your life on the same schedule every day – if you deviate from it the heating is either wasting power while you’re out, or you’re freezing and have to reach into the cupboard to press the override button.
I’d love to have a smart thermostat such as Nest or Hive but they don’t support my electric heating and as this is a rental house, I’m not able to modify anything to support them.
What I Wanted To Do
The control spindle that is rotated by the pegs has a small slot on the top that can be turned manually using a screw driver to toggle the heating on an off. I can remove all of the pegs and use a stepper motor to very gently turn the spindle each time I want to change the heating state. I could then connect this to a controller that receives instructions from the internet, and write whatever software I wanted to run the schedule.