Recently I bought a Monoprice Voxel (a rebranded FlashForge Adventurer 3) 3D printer, and I’ve spent the last couple of weeks getting to grips with it. I’m very impressed – it works well and I’ve had a lot of fun building parts of my projects.
One interesting this about the printer is that it comes with its own slicing software called FlashPrint. This seems to work quite well, slicing all the models I threw at it and sending them to the printer. However, I was curious if it was possible to use the printer with the Ultimaker Cura slicer, which has some more advanced features and is supported more widely by the community.
I did a load of research and found some interesting topics on reddit and Ultimaker forum, I also examined the .gx files produced by FlashPrint and thoes sent to the printer by PolarCloud. I’ve gathered all this together into a this guide for using Cura, but it stands on the shoulders of a whole bunch of other people in the community, so thanks to those people you really helped me figure all this out.
Update (January 2011): A YouTube user confirmed that these steps also work for the FlashForge Adventurer 3 Lite.
Disclaimer
Every model I have printed in this way has worked well and I am very pleased. However, follow this guide at your own risk – If something bad happens to your printer, on your own head be it.
Observations
FlashPrint and the printer appear to use a custom file format for printing – .gx. This is identical to the .g file used by other printers but with some additional metadata at the top. I suspect this is the image of the model that’s shown while printing, as well as the print time estimation.
The printer is perfectly happy to print .gcode files, provided the file extension is changed to .g first. While printing a .g file the time estimation on the printer screen does not count down the remaining time, it counts up the elapsed time. Also instead of a small image of the model being shown, a generic icon is displayed.
Update (November 2021): I’m hearing from some people that after updating the printer to the latest firmware, that they get a “file format error” on the printer when using Cura sliced files. It seems like FlashForge have changed something (deliberate or otherwise) that is blocking Cura. I don’t have a solution to this right now, if you have more information, do get in contact. If this works for you do not update the printer.
Getting Cura
Firstly, you need to install the latest version of Cura from the Ulimaker website.
Adding a custom printer
- In Cura select Settings > Printer > Add Printer
- Select “Custom FFF Printer” and change the name to something meaningful

- On the machine settings, change the Height, Width and Depth to all be 150mm. Then tick the “Origin at Center” and “Heated Bed” settings.
- In the Start G-Code box, remove the text that is currently there and enter the following:
M118 X15.00 Y15.00 Z0.51 T0
M140 S{material_bed_temperature} T0
M104 S{material_print_temperature} T0
M104 S0 T1
M107
G90
G28
M132 X Y Z A B
G1 Z50.00 F400
G161 X Y F3300
M7 T0
M6 T0
M651
M907 X100 Y100 Z40 A100 B20
M108 T0- In the End G-Code box, remove the text that is currently there and enter the following:
M140 S0
M104 S0 T0
G28 X Y
M132 X Y Z A B
G91
M18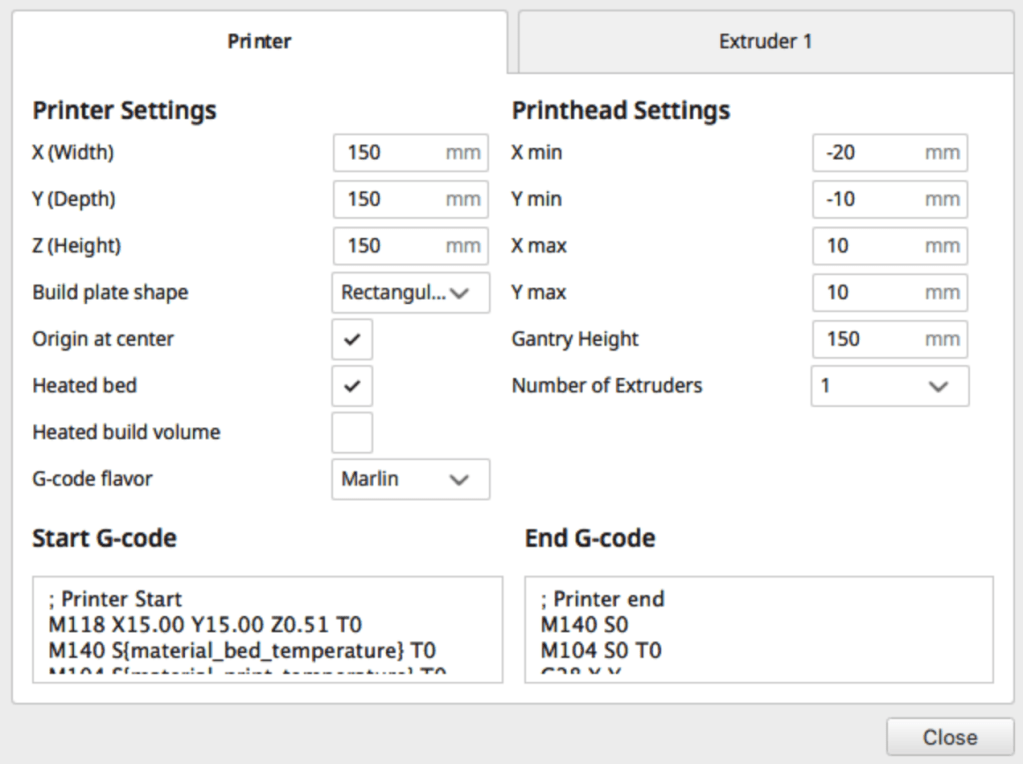
- On the “Extruder 1” tab set the “Compatible material diameter” to 1.75mm

- Click “Next” to save your custom printer. You can now use Cura to slice your model as with any other printer.
Use The Sliced Model
Now that you’ve got your model into Cura and sliced with with your settings of choice, you need to get that onto the printer. To do that you have four options…
USB Stick
You can save the .gcode file from Cura onto a memory stick, move it to the USB port on the front of the printer and select the file from the build menu.
However, you must manually change the file extension from .gcode to .g or the printer will not see it. Unfortunately there’s no way to convince Cura to save it with the right extension – you’ll just end up with a .g.gcode file if you try.
With Adventurer Client
I recently released a little tool that allows you to quickly send files to the printer by dragging them into the app (no need to rename them as with FlashPrint). I’m still building it out with more functionality, but is available here now for both Windows and macOS.
With FlashPrint
If you rename the exported .gcode file to .g, you can simply open it with FlashPrint. This will allow you to print the file over the network. As this is an already sliced file, FlashPrint will not re-slice it – it will just send it to the printer.
[Advanced Users] With AdventurerClientDotNet
I wanted to know how files actually got transferred to the printer, so I spent some time sniffing the network traffic between FlashPrint and the printer. Then with the help of this command reference and DarkDiamondV’s comments on this thread I wrote a little library using C# and .NET core.
I’ve uploaded the source to GitHub here – its still a work in progress, it supports reading some information off the printer and transferring .gcode (no rename required) files from Cura.
A self contained build for Windows can be found on the releases tab – Simply run the .exe file and follow the prompts.

Using this method is obviously very experimental, so is probably best used only if you’re comfortable with digging into things when they don’t go to plan. I wrote it more as a interesting challenge as much as anything. Obviously, use this at your own risk :).
Video
You can also follow this guide as a video, below.
Wrap Up
I’ve tested all of the above with the Monoprice Voxel, which should be the same as a FlashForge Adventurer 3, and possibly other FlashForge products, but as I do not have access to them right now, I’m not able to say with certainly.
If you do try this, and it works (or not) on your device, I’d love to hear your feedback or anything you learned along the way – leave a comment or tweet me. If you’re feeling especially pleased, you can buy me a coffee.


Just for reference, for me on the latest Voxel firmware, this didn’t seem to properly deal with the temperature control, defaulting it to 235c no matter what. I’ll have to look into this a little more to find out why.
LikeLike
For me, although the idea is great, it doesn’t work well. My printer stops every few minutes with a “Filament Error” and I have to continue it. After 5 or six times it gets a bit irksome.
Not sure why this should be, although the Start gcode doesn’t match what FP produces, but even replacing Andy’s gcode with what FP inserts, I still get the filament error every few minutes, so I have given up.
LikeLike
Same thing happens to me, did you manage to fix it?
LikeLike
same
LikeLike
Thank you sir
LikeLike
Hey, great guide, but I tried renaming the cura file from gcode to .g and it looks fine, but once on the usb and in the Monoprice Voxel, it says ‘file format error’ whenever I try to print. It’s a long shot, but any advice would save my bacon!
LikeLike
Hm, interesting. I’ve not hit this problem myself so I’ll brain dump a few debugging steps and see if we can figure out what is going on:
– Can you check the firmware version on the Voxel, please?
– Can you check the version of Cura you used, please?
– What Operating system / version did you use to slice it?
– Have you tried another method for transferring the file, like FlashPrint or (*ahem* shameless plug for my own app) Adventurer Client?
– Does your PC operating system hide the file extension from you and when you changed it to .g it actually ended up as File.gcode.g?
– Can you open the .g file in a text editor and make sure the file looks reasonable – it should be a file of text a bit like this (in particular check that lines “M140 SXX T0” and “M104 SYYY T0” look good, where XX is the print bed temp and YYY is the extruder temp you used)
;FLAVOR:Marlin

;TIME:7211

;Filament used: 4.64322m

;Layer height: 0.1

;MINX:-37.8

;MINY:-30.8

;MINZ:0.36

;MAXX:37.8

;MAXY:30.8

;MAXZ:16.86

;Generated with Cura_SteamEngine 4.4.1

M82 ;absolute extrusion mode

; Printer Start

M118 X15.00 Y15.00 Z0.51 T0

M140 S60 T0

M104 S220 T0

M104 S0 T1

M107

G90

G28
Andy
LikeLike
Great advice, I’m currently downloading your app now 😀 On the rest, I’ll get back to you, it’s been a wild day. Thank you!
LikeLike
Hi Andy, thanks for your work on this. I am trying to get my printer working with Cura but the nozzle is always too low at the start of any Cura sliced file. I have made a detailed post on reddit with the steps I have taken – and I hope you don’t mind I have linked to your blog here as well as your Adventurer Client as I could not find these referenced elsewhere on reddit and felt it would benefit the community. The post is here – https://www.reddit.com/r/FlashForge/comments/kfjvz8/adventurer_3_cura_48_set_up_and_troubleshooting/ – if you care to take a look.
LikeLike
Hi Andy,
Thanks for the write up. I used your app to transfer a benchy file to my Adventurer 3 and it worked amazing.
I did encounter a problem with the print though. About 40 minutes into the print, using a Cura sliced model, I get a generic filament error. I’ve tried checking for blockages, and can’t find any. Tried checking the spool movement, and it seems fine. Inspected the filament for inconsistencies and it also looks fine.
I then switched back to a Flashprint slice, and it printed fine, with no error.
Thinking it may have been an anomaly I went back to the Cura slice, and it errored in the exact same position as the first time.
I’m new to this, so my troubleshooting knowledge is limited, would you happen to have any ideas on how to trouble shoot why the Cura slice based on your tutorial could be producing an error?
Regards! and Thank you!
LikeLike
I’ve not seen this error myself, but interestingly you’re the second person to report an issue part way though printing a print. The discussion on that is here: https://www.reddit.com/r/FlashForge/comments/kfjvz8/adventurer_3_cura_48_set_up_and_troubleshooting/
The current line of thinking is that the newer printer firmware has a new 9-point calibration mode that needs to be recalled in the start G-code, if you used this calibration mode it might be worth trying single point calibration and seeing if that made a difference.
Otherwise, some generic debugging questions for you:
– What version of Cura did you use
– Wah is the printer Firmware version?
– What settings did you use in Cura during slicing? Are the (roughly) equivalent to the ones in Flashprint?
Andy
LikeLike
Thanks for the reply!
Is there specific method of “choosing” the single point calibration? I had run a 9 point calibration previously.
I just ran the single point again to “save” the new calibration settings and ran a benchy print again, and it failed in the same spot again.
I’m using Cura 4.8
Printer Software Version: 1.2.1
Had the flashprint up at the same time and attempted to match as many settings as I could to the High quality setting of flashprint. And yet it still errored even though all the settings I could see were the same.
Unless I have to somehow change the calibration outside of just running the single point manually.
Only other thing i’m thinking of is possibly something to do with the material type in Cura? I used Generic PLA, not sure if that changes anything.
I did notice that even though in Cura I had the printing temp set to 210, the printer was actually printing at 230+
Not sure if that is a clue/issue.
Tristan
LikeLike
That should be enough to work around that issues, so its probably not related to the calibration. Are you willing to share the model & g-code files that are being problematic? They’ll probably need to be compared side by side to figure out if there’s anything odd in there.
LikeLike
Couldn’t reply under your current reply, so replying here.
here is the the model and the gcode slice from cura
https://www.transfernow.net/NNz4mR012021
LikeLike
Thanks for sharing thoes. Comparing your g-code file to a few I generated from the same model, it looks like it is extruding very little material in each layer – much less than it seems to on its default settings.
I was able to generate a very similar code file to you (I didn’t try printing it yet), by using Cura’s “normal” profile and changing the layer height to 0.1. Is possibly the same thing you did?
I sliced the model using the Fine quality And it looks to be extruding quite a bit more material with the same 0.1mm layer height. My printer is busy at the moment (FlashForge, if you’re reading this and want to send me some test units, I’m listening), so I haven’t tried printing it myself but you can download It here if you want. https://www.dropbox.com/s/qcsg1hfkhp07tnz/CFFFP_3DBenchy_Andy.gcode?dl=0
Andy
LikeLike
Hmm that’s interesting.
I believe I just used the default “Fine” 0.1mm profile, but then tweaked a few settings to be similar to Flashprint
Which part of the gcode indicates how much is being extruded per layer? Maybe I can fiddle with it as well and see if I can self diagnose what the issue is.
In the mean time, I’ll try print the model you provided.
Thanks Andy!
LikeLike
I’m looking at the “E” section of the G1 commands – which basically means, “move to this location while extruding this much material”, it seems like its consistently using less material.
LikeLike
So I attempted to print the file you provided.
It resulted in the base layer not really coming down at all. Almost nothing was extruding. I uploaded a video and you can see that there is only the very faintest outline of the base layer going down, both no filament is really coming out at all.
https://www.dropbox.com/s/m7ibx8hkeqjoi1w/PXL_20210105_132604005.mp4?dl=0
LikeLike
Okay, I’m trying to print the same file now. So far the skirt has printed okay, we’ll see if it fails later on.
It sounds in your video like it was knocking quite a bit, was the extruder temp correct? Could there be a slight blockage? Might be worth hitting the load filament button and just pushing through a decent amount of plastic.
LikeLike
Yeah a lot of people have reported that knocking/popping sound on the subreddit. And it seems to be that it is to do with the filament not coming through properly. I occasionally hear it in normal builds but never as much as in the video.
“Might be worth hitting the load filament button and just pushing through a decent amount of plastic.”
I actually printed a test cube immediately after to test the same thought, and it printed completely fine =( it seems like theres something in the cura file that is really not sitting right with my printer.
LikeLike
It does rather, but I can’t imagine why it would be different. Do you have a Reddit post for this issue already? Might be worth getting some other ideas
LikeLike
Thinking about it, I wonder if it’s nocking because the nozzle is too low to the print bed. And we’re now looking at the same issue as here: https://www.reddit.com/r/FlashForge/comments/kfjvz8/adventurer_3_cura_48_set_up_and_troubleshooting
If you look at the g-code from FlashPrint, are you seeing any G29 or M420 codes in there that are missing from Cura?
Thanks for all your patience debugging this.
LikeLike
Hi Any,
I checked both our Cura slices, and a Flashprint slice, and could not find a G29 or M420 code in any of the three.
Happy to help 🙂
LikeLike
Super helpful article and I really like the adventure client 🙂
A couple of things I’ve noticed, when using Cura/Adventure I need to move the z-calibration up to -0.1mm as opposed to using FlashPrint where it needs to be -0.3mm. I haven’t found any settings in Cura that will allow for a z axis adjustment.
Also would it be possible to update the adventure client to default to the last used IP?
Thanks again!
Albert
LikeLike
So glad you found it useful, thanks for getting in touch.
You’re not the first person to notice this z-calibration anomaly, it was discussed on Reddit here: https://www.reddit.com/r/FlashForge/comments/kfjvz8/adventurer_3_cura_48_set_up_and_troubleshooting/
My understanding is that in the 9-point calibration added in newer firmware versions, the g-code needs a command in it for the printer to recall and use the calibration settings, else it uses its default. We’ve not isolated what that command is yet – some fiddling will be needed.
Storing the last IP is already on the docket for the next update 🙂 https://github.com/andycb/AdventurerClientJS/milestone/2
LikeLike
The information you give is very useful, thank you. I would like to ask you if you know what the maximum speed limit is for the Z axis of the Adventurer 3. In the Flashprint I see G1 Z 0.20 F420 while in Cura G1 Z 0.20 F600. I also tried the Prusaslicer and the speed in generated g_code for the Z axis is F4800 !!!. However, there is no Z axis speed adjustment in any Slicer.So I wonder if the firmware takes care of the max speed?
LikeLike
I don’t know, sorry.
If it’s pushed too far, I’d imagine either the firmware would clamp, or it would just move the stepper as fast as it could. I doubt this would harm the printer and seeing as its not extruding during a Z move it wouldn’t affect the print quality. Try it at your own risk, though, if in doubt I’d take FlashPrint’s numbers as it knows most about the printer.
LikeLike
Andy, Have you been able to figure out anything with the 9-point leveling and printing too low? I too am seeing this issue.
LikeLike
Hey. Unfortunately, I have’t had a chance to look into this beyond the original discussion. The best ‘solution’ so far is to disable 9-point calibration in the printer settings.
I think the best avenue of investigation to get to the bottom of this is the figure out which G-Code commands need to be added to the start G-code by inspecting some known good slices from FlashPrint,
LikeLike
for the 9 point calibration, first perform the 9 point, then perform the center calibration, this corrected the issue for me. i found this suggestion on another thread. Im currently having a different issue, just reading through before i post, saw this one and figured id help out
LikeLike
I’m actually thinking of ripping out the LCD and mainboard and put a 3rd party mainboard and LCD in where the old was. I bloody hate Flashforge now, I see how many ppl print with no raft etc on other printers and it makes me jealous.
LikeLike
dont do that yet, im printing a cube right now, so far so good!!! cross your fingers and i will upload everything as i have no clue what i did, but im sure andy will.
if its successfull, no bad sounds so far and temp holds steady
LikeLike
Hey Andy
I change file .g and transfer it with your adventure ( I like it) but it keep saying format error
I even using gx and gcode to see if that would help but keep saying same thing. If u can help with this it be great.
I have windows 10
Flash forge Adventure 3 version 1.2.3
Control Version 1.6
Kernel version 1.0
Library version 1.0
Ultimaker Cura version 4.8.0
LikeLike
Hi,
Are you getting an error from the app, or the printer, or both? Can you check what version of the app you are using for the transfer, please?
If the app is having errors, it should write a log file here, too – C:/Users//AppData/Roaming/adventurer-client which will be useful for knowing what’s happening.
Andy
LikeLike
Hi Andy,
thank you so much for this – this is just great!
I managed to finally print with cura (4.8.0). My printer is an Adventurer 3 with Firmware 1.2.3.
When slicing with cura there are a few things I noticed that are necessary with regards to the temperature settings: if in cura I use temperatures with decimals (such as 215.0), the printer does not understand that and just fails to heat. This is valid for both the nozzle as well as the bed.
So once the print started with basically cold nozzle and bed, which obviously failed.
I used the 1.5mm layer default preset in cura and after adjusting the tempertures to something w/o decimals (i.e. integers) for both the nozzle and the bed (e.g. 215 and 45, instead of 215.0 and 45.0) it printed fine.
One further this is that I can confirm that the printer seems to heat to an offset of approx. +7°C (for my printer), i.e. the 215° set in cura result in 222° while printing.
Last thing: I had to reduce the flow rate to 90% to get the right amount of filament extruded. This is also a “problem” in FlashPrint, where the printer has a default of 109% as a flow rate, which I had to reduce to approx. 100%. If I don’t do that the prints get a bit “chuky” and wall thicknesses are not very precise.
Now I have to finetune cura, I guess, as the print layers look very irregular. So cura works, but the results as of now with FlashPrint are better. I’d highly appreciate anyone sharing his cura print config/settings to get better results.
LikeLike
Hi Andy. We’re looking into getting a proper printer profile for the Adventurer 3 in Cura over at github: https://github.com/KeltE/Flasforge_Adventurer-3_Cura_Definition
Feel free to join in. I’m currently the tester, and another guy is doing the coding to get this thing to work.
I also did a side-by-side comparison of a xyz-cube sliced in Flashprint and in Cura with your start- and end gcode, and the Flashprint one comes out much nicer, sadly. If you want to help out, just jump into the discussion boards over at github!
LikeLike
Hi,
I’m not much of a programmer or anything, but I was curious, does having ” ; Printer Start” and “; Printer End” in the beginning of the start and end code do anything? Are they just comments?
Also is there a reason that the estimated print time on Cura is different/ much shorter than the actual print time on the printer (usually nearly twice as long as estimated)?
Thanks in advance,
Red
LikeLike
Yeah, they’re just comments – the printer ignores them. Cura adds quite a bit of stuff to the top of the file before the Start G-code is added, just having the comments around it is handy when debugging.
In my experience using this printer with Cura, its estimates are always a bit optimistic. I’ve not used it enough with other printers, though, to know how accurate Cura is normally. My guess is that Cura is summing up all the speeds & distances it tells the print head to move and the printer is running slower than expected by some error margin that builds up over longer print jobs.
LikeLike
It seems like at the end of the print, it doesnt really return to home, but instead just slightly raises the print head and puts the bed forward. im not sure if this is intentional. I just feel like it might collide with some models
LikeLike
It’s possible to add the code to move print head elsewhere at the end of the print. If I recall correctly, FlashPrint doesn’t do this? Unless you’ve enabled an experimental mode in Cura, the model will always print from the lowest to highest layers without backtracking. So when the head moves up at the end it will always be higher than the last layer / highest point, so collision should not be an issue.
LikeLike
Why am I just finding this now? I tried the app and it worked fine in both monitoring the printer as well as sending a file to print. I’m using an ADV3 LITE. Firmware 1.1.6 I think it is.
I thought I had set Ironing on for the top layer but I didn’t see it in action. Printed a 20mm XYZ cube and it came out fine. I’m a CURA NOOB, but it was as smooth as any I’ve printed and dimensionally it was perhaps 0.025mm better than any I have printed with Flashprint. All sides were within 0.1mm or less.
Now I’ve got to start learning what I can do with CURA.
LikeLike
Well I was the anonymous poster that managed to print a good 20mm calibration cube. But since then I’ve had nothing but issues with CURA. I even went back and uninstalled and reinstalled 4.8.0 and recreated my printer etc.. It seems to really just have issues with the code at some level or another and you think it’s past one issue and then it starts to misbehave at another spot. I don’t think you can just cut and paste start and stop codes and expect an Adventurer to just make great prints.
It seems to me there’s a whole lot more information that should go into a printer definition file and extruder file etc., and then maybe there might be some progress. But with closed proprietary firmware I just don’t see a solution here.
LikeLike
Thanks for your grate work.
Is there any chance that you could port your upload tool to linux?
Thanks
LikeLike
Hey. Glad to hear it works. Ostensibly the tool should already work on Linux as it was written to be cross platform. But I could never get the build to work to publish automatically. If you’re comfortable around code, it should work on Linux following the steps on the GitHub readme.
LikeLike
Hi,
I keep getting format error from the printer.
The smiley face does come up on the Adventurer client and the status says the print head is moving but it always comes up with error on the printer.
LikeLike
Hi, unfortunately im getting a error from the printer. I slice it in cura and then rename from gcode to g, then use Adventurer client, it send the file but when it gets to the printer it says error.
LikeLike
Hi, looks like you’ve got caught in issues with the new firmware version. It Seems like Flashforge have made some change that’s causing this error. Nobody has a workaround yet.
LikeLike
To get around this you have to remove the .0 after the temperature and make sure T0 is after the m104.
this will allow the printer to start printing, but mid print will freak out
LikeLike
Hi, Thank you for the amazing tutorial. I am having an issue and before I loose anymore sleep, I would like to ask……my firmware version is 1.0.9-1.4:
I can get my voxel to print, I have even gotten the temp readings to be correct. At first I was experiencing and extremely loud grinding sound from the stepper on retractions. I was able to fix this by examining the gcode and adding T0 to the m104 line that is switching temperature from first layer to the remainder of the print.
The LCD will show my temps randomly dropping to 0 then back to what they should be, as far as I can tell, the grinding sound happens when this is 0 for too long, it has snapped filament as well.
After doing this, it printed up until about half way and then just stopped. Apparently this is what the extruder will do if it reaches its thermal limit……im printing at 200 and 245 is the limit.
upon examining the gcode, I have noticed lines that are not in flashprint: G92 E0 and G92 E0, not sure what they do.
Then at the Start Cura shows a m107 while flashprint is M108 T0 and M106.
Their has to be a way to get this to work, I am close, and closer than ever, I have combined your guide and another.
the other one also specified using polar cloud to print, he then continued if you don’t you will get the print randomly screwing up and randomly printing fine. I don’t know how this plays into any of this
I have not bothered using your client, I am currently using usb, I am not sure if using the client would help.
any advice would be helpful, I can upload the gcode for both as well.
if this is the firmware, is it possible to downgrade? I cannot go back to flashprint, after seeing the first 50% of my print, I just cant go back, lol
I am also always available for testing, literally always. This has to work and if you are willing to work with me I am pretty sure we can get it going for everyone.
Thank you in advance for any help and advice that you can give
Sincerely, John
LikeLike
This is fantastic debugging, thanks for sharing back your findings so far. I’ve honestly never go to the bottom of the mid-print shutdown issue – a few people have mentioned it to me, but I’ve been able to do some 20+ hour prints without issues on my printer so its been a challenge to figure out.
When I was first trying to write this, I used the PolarCloud method. They (when I was trying before at least) use the Cura Engine for slicing with their own front end. So you can schedule a print, then go to the queue a download the G-Code.
If I remember correctly, there’s some differences to where I place the extruder at the start of the print, (Polar cloud or Flashprint, I think always wanted to centre it, rather than going directly to the first point), which might account for the G92 bits. The M108 & M106 codes looks like a promising lead, as these involve the fan and heater, did you try adding them in Cura yet?
LikeLike
thank you very much for your kind words, i am a noob so it means a lot that i have actually helped lol
I am currently printing and so far so good, bad sounds are gone and I didn’t edit any gcode, which is what I want.
I’m not sure if my firmware is the newer one, but I got my printer in nov 2021 so I assume it is as I updated it. firmware1.0.9-1.4
for the temp difference i am pretty sure its related to the temperature offset of your extruder, when I installed the new one, my offset was 8 degrees, when i print at 205 it shows 213….205+8, this seems consistent
if I’m successful with this print, may I upload my findings and settings for you to examine? I am a complete noob but a bit of a hacksmith myself much like you are.
there has to be a way, I’m either going to break this pos trying and get a new one, or make it work.
LikeLike
It printed successfully, the dimensions where perfect except height was off by .5mm, so I assume leveling is off. I have uploaded everything here, please let me know if I can provide more info, I am going to do a benchy now.
I have included, the stl, flashprint slice, cura slice, my print settings and my machine setup.
there are some pictures and videos to show the detail and I have linked the other guides i used.
to fix the end, where the extruder doesn’t return home, I just did homing and it went up, but i beleive you mentioned somewhere we can fix that, so I think adding something to end code would fix it…..I don’t want to touch it lol “if it ain’t broke done fix it.”
All of this trouble for a Goku…..for my cousin…..
https://drive.google.com/drive/folders/1mP8dc9fX834njFS_vd2ZXaF0BXmWt98e?usp=sharing
LikeLike
Benchy printed fine at first and then when it got to the retraction tests my stepper motor freaked out again, it still printed right till the end and fine. I found a setting and adjusted it from 90 to 18, it was “maximum retraction count”, I’m past the freak out point and looking good
I adjusted the number to 18 because everything was a factor of five so I divided 90 by 5, I don’t know what that setting does but if it prints successfully to the end I will upload the new profile
I think it is how many times it retracts in a section, and I think the reason my temperature is freaking out is as it’s retracting way too much it’s probably disconnecting the sensor
I’m not sure if this is accurate or if I misinterpreted what the setting does but my sound is 100% related to retraction and if it makes it again I will take a video of it
LikeLike
This is the last update, Benchy printed, with really bad stringing which is probably related to retraction speed and amount as well as my temperature, the grinding sound is gone I had to change maximum retraction count to one. 18 made it better but it still showed up near the end.
I am going to upload my profile to the same location, I am also going to put together a guide, please update this page so other people can see it as it works
I’m going to further tweak my profile but at least I know this is starting point works
LikeLike
This is fantastic, thanks for sharing. It looks like you are really really close to a grate print. I’ll take a look through the settings you shared when I have a free moment (I’m a bit busy for the next few days 🙂 ) and put some updates on this article. Is there any particular name you’d like to be credited with?
In the meantime, regarding the end of print homing – in end G-Code, it has `G28 X Y` – which only send the printer to home in X and Y but not Z, if you change this to just `G28`, I think it will work as you want and send the nozzle back to the top corner where it started.
LikeLike
Hey thanks for the reply, please do, and take your time as I am still making progress. For credit if you have to, you can credit JoHnEyAp, but I am not about credit, I just want to help and think im on to something here. And to be fair, I used alot of reddit posts and guides.
First off, for the temp issue I see, by adding T0 after the m104 sxxx, that dont have them, it will read correct, as far as I can tell its related to the temp change after layer height. I cannot for the life of me remove it from cura, the first layer temp records correct, second is +8.
My bad ass grinding sound is related to combing and retraction, by only reducing retraction or removing combing, it will still reappear. I can take retraction and combing off and print 100% everytime, but with horrible stringing of course, but sexy layers….
I think flashprint handles integers differently, and i seem to have more success with moving the decimal over. For instance, flash print default for retraction is 5.5mm and 25mm/s, i have changed these to 0.55 and 2.5. my stepper also doesn’t sound like and ender3 anymore, lol
I will add that to the code to see if it fixes the homing issue, its not a big problem but it is annoying.
do you have a workings cura profile that i can use as a starting point?
if i switch the gcode flavour, will that break anything? i read someone trying to get this to work with pursa slicer had used a different flavor, but we dont have that choice, i dont remember the name but one person mentioned reprap, i havent tried becuase im pretty sure marlin will work.
i will continue adding stuff to the link i provided earlier, i am going to amalagamate whats there as old and make a new one, feel free to drop the profile in their as well if it allows you too
LikeLike
Just a quick update, ive noticed the code from you causes a wierd whine at the start, i was able to fix that, but still fails at 80%(much better than 20%)
what ive done is downloaded flashprint 3,4 and 5. I have sliced a blank file in each, here are the outputs: End code is the same for all 3, how i fixed the whine was by adjusting the M118 and the G1 lines to match FPv5.
I am currently trying to get cura to output a similar file. From what i can see and find, its related to the way adv3 handles extrusion, there is no G0 in flashprint, it is handled by M112 emergency Stop, tahs how retraction is done, through G1 Exxxx. The value dertermies retract or extrude.
thats why their are no G0s in a flashprint file.
this is our problem, how to fix it is the next question. i am currently trying adv4 setups, will post results.
Here is a fantastic article and in depth dive on our printer, dont know how i found this:
https://take4-blue.com/en/adventurer3-control/
FPv3:
M118 X9223372474941440.00 Y9223372474941440.00 Z-1373088.13 T0
M140 S50 T0
M104 S210 T0
M104 S0 T1
M107
G90
G28
M132 X Y Z A B
G1 Z50.00 F400
G161 X Y F3300
M7 T0
M6 T0
M651
M907 X100 Y100 Z40 A100 B20
FPv4:
M118 X9223372474941440.00 Y9223372474941440.00 Z0.00 T0
M140 S50 T0
M104 S210 T0
M104 S0 T1
M107
G90
G28
M132 X Y Z A B
G1 Z50.000 F420
G161 X Y F3300
M7 T0
M6 T0
M651
M907 X100 Y100 Z40 A100 B20
FPv5:
M118 X20.00 Y0.00 Z0.10 T0
M140 S50 T0
M104 S210 T0
M104 S0 T1
M107
G90
G28
M132 X Y Z A B
G1 Z50.000 F420
G161 X Y F3300
M7 T0
M6 T0
M651 S255
Anyways thought id post this, if you want the whine fixed ill give you that one, but it still doesnt work for me so i figure whats the point.
through alllllllll of the differnet gcodes i have found, the right answer is their.
maybe you can help me understand, how come so many different start codes seem to work for so many different people, but not everyone? i think its because it is wrong and perhaps cura settings are the common denominator here.
still if 0 retractions it will print find, 0 retractions = only G1s, go figure
my head hurts
LikeLike
also forgot to add, i was using mp-flashprint v3.2.3
i went to flashforge and got flashprint v5, sooooo much better, i dont even think we need cura anymore.
Cura is better, but fp 5 is good too.
the bed leveling issues i experienced before and that fix is 100% the order. first do the 9 point, then do the center point, use a 0.1mm shim. It is caused by the printer storing the final value as center, so bottom right when doing 9 point last. Adv4 has the same issue FYI
LikeLike
Another Update:
this code is cleaner and correct, it fixes the whine, i believe it is because it is now correctly pulling the coordinates from the machine, instead of forcing it, this is the bare minimum to get to the failure point, now, what is missing? what is extra? this is the path i am working on, but trying to understand the difference between g90,91,92 161 etc is impossible for me without help.
i am working to get cura to produce as much code as possible for us, with the bare minimum required to start printing to where your code gets me. I compiled this code from a list of ALLLLLLLLL the different posts all the way to the corners of the web
;start
M132 X Y Z A B
G28
G1 Z15.0 F6000
M651
G92 E0
G1 F200 E3
M108 T0
G92 E0
;end
G92 E1
G1 E-1 F300
G28 X0 Y0
M652
M18
please examine this and let me know what you think is missing, as far as i am aware G1 F200 E3, MUST be at the end, this is what sets our machines internal coordinates in play.
the reason your code works for you but not others is the coordinates are yours. they are not mine and it causes a desync. The reason it works for others, is the same, they happen to have the same offsets as you.
if we can solve this, im sure we can get this officially added to cura
still testing, but before i loose this one, i needed to dump it.
please let me know if their is someone else i can reach out too that may know gcode better, i am new but have learned alot in the last ~20 days, i dont know who is a coder in this stuff, i do computer hacking, consoles, im an end user but look at code, it was very useful here.
HELP! lol
LikeLike
Ok, so I’ve worked it out, there is a digital handshake between the printer and ffslicer. It is stored in the m118 line “serial print”
I’ve overflowed that line and BAM we printing!!!!!!!!!!!!!!!!!!!!!!!!!!!!!!!!!!!!!!!!!!!!!!!!!
Firmware: 1.0.9 – 1.4
NO BAD NOISE
NO CLUNKING
NO TEMP DROPS
FILAMENT SENSOR = ON!!!!!!!!!!!!!!!!!!!!!!!!!!!!!!!!!!
WOOT WOOT WOOT WOOT WOOT
Cloud freaking 9 today!
I lied, I want some credit, this was hard!
I will release this method shortly, just want to 100% make sure, BUT I also need to talk to people who understand gcode better, I think we can get cura to do all this for us.
20 days, with about 4 worth of sleep, damn that was pissing me off!
Some quirks to note:
Your code when it fails at 20% was much further along in the print than my code at 20%, is that weird? I read in that link I had posted that it is due to a sync issue, so that’s what I need to discuss, I can fix that sync, I have the code, just not sure where it goes, if we can do that we won’t need gcode manipulation for this to work straight out of cura, I’m pretty sure of this anyways, I need to discuss some things and preferably live chat as I have a ton of questions I can’t get answers.
Some of which, g28, g29, g90, the all seem interchangeable, which is correct? Do we need them all?
Just those kind of questions.
Hahaha I bet you all thought I was full of sh*t……haha I started to think I was >_<
Pictures and proof:
https://drive.google.com/drive/folders/1ozlgujdAg9yh6MAWcYeGPZGbKvGuAVxJ?usp=sharing
LikeLike
Just some quick quirks that I’ve noticed, after I create the file and save it I can no longer open it on my computer, I can open it but nothing loads it takes at least 10 minutes because that’s how long I left it
Very weird but who the hell cares it works
Second benchy going, I’ve added all the settings back like combing and Union overlap, things I’m not sure what they do.
LikeLike
I reached out to monoprice as flashforge will give their customers and xcode to G-Code converter and that’s the problem we have
Monoprice sent me to your website, LOL I told them I’m already here.
Will keep updating but if I can get that tool, everything I’ve done doesn’t need to be done
LikeLike
Here is a link to the guide and files required to do this exploit.
I will host for a bit, but if you know where I can upload permanently I would appreciate that
feel free to copy and paste the guide, I have added credits for the required posters who i used.
https://drive.google.com/drive/folders/1qyNU8nVrIMa1mQyswc4zx4RFHvSquMD0?usp=sharing
Imma go spam reddit!
LikeLike
This is the last update I swear, I fixed the end code it homes correctly and I cleaned up what was it necessary as per flashprint 5, the code is correct the procedure has been refined, this printer is now supported by cura because of this file
I submitted the file to ultimaker in hopes they can actually see what’s happening behind the scenes and apply it, that would be awesome.
If anyone else could convert the code that the template has, into a program that would be awesome as well, and probably a lot better for people
LikeLike
Okay, I’m back 🙂
Looks like you’ve compiled a lot of good information here. That little block at the top of the GX file is a binary encoded block that does the _extra_ FlashForge stuff. Among other things, it contains the little preview image that you get when you print using their own software. When I first made this article, it was happy for it to be missing, looks like the change they made was to make it no longer optional.
What would be good to know is if it needs the header, but it does not need to be valid / specifically defined for the file / printer (in which case we can just add a generic one to the top), or if it contains some kind of specific information designed to lock out non-FF slicers.
Did you try just adding `xgcode 1.0` at the top, without the rest of the stuff it put after it?
LikeLike
Hey thanks for the reply, yes I definitely did that it does not work I’ve also tried taking the header and putting it into the cura g code, same fail.
If you open the template, just type one letter into it and then close it with the X and choose save when it asks, reopen the file and you’ll see what it does, their will be a bunch of crosses and other weird characters so it is definitely doing something to the code after the fact.
I haven’t been able to find a way to get it to work without doing it this way. The way I got that file was I sliced a file that had Infinity filament, I’m also wondering if we change the M118 line to a higher value, would that also do this? I’m not sure how to edit that line or what the maximum value is (I believe there has to be a maximum value and if we put that in it I’ll just print everything) I’ve tried what flash print 3 gave me and it doesn’t work. It’s like m118 x 19293949399 y 8383949493 z848483939, that doesn’t fit and gives file format error
I think the ultimate problem is the header we had on M118 is looking for a 20 minute print and X amount of filament, and when it reaches its limit it doesn’t understand why it isn’t finished and freaks out.
It shuts the extruder temp off and repetitively cold pulls.
I also think the code I received from Tech support, g92e0 g92e0, might be what’s needed at the top, after doing what I’ve done I finally got it to stop spitting out the 3 mm of filament at the start, is it possible that’s what it’s looking for? Somewhere there is a digital handshake a lock and key and if we can figure out what line that lock and key is on we don’t need to use this anymore.
I also got flashforge real file and program to do all this, I’d be more than happy to give it to you I just don’t think it’s as straightforward believe it or not.
So from what I understand you make your code in cura, then you have to run it through a program which converts g code to xcode, I’m 99% certain that template is doing the exact same thing and because I sliced it with an Infinity file it had no idea how to run the code and so it spat me out prior to running whatever that header is.
If you could work that header into a tool that not only changes the m140 and m104 lines with the t0 but also does what that thing’s doing that would be the ultimate and easiest solution.
Flashforge also emailed me on how to fix the time and filament they said if you run it back through Flash print it’ll fix it, but when I try to reload the file and Flash print or Cura it errors.
The other thought I’ve had, but I haven’t done it what if we slice a Benchy in cura and slice a Benchy in flashprint, then take the header from The Flash print then sheet and place it in the cura benchy, would that now report correctly because it is technically the same print. I doubt it, but if it does work then someone smarter it will be able to see what is actually happening and be able to break the mod 9 or whatever encryption there is, mod 9 is why your credit card is not one number off somebody else’s.
I printed Goku as well! It was all worth it and now my reward is a new printer LOL one that does five colors and water soluble supports
I hate supports
LikeLike
Hi Andy, I did everything & sent the G only code via your Adventure client & I get a format error. Can you please help?
Steve
LikeLike
Hi,
There are some known issues with some firmware versions. What firmware are you using on your printer?
LikeLike
I have the original firmware. I was going to update it buy now I get an error code 00010002. Can’t get past it until I can figure out why I got this code. So far, printer has been frustrating.
LikeLike
I’m using the same firmware that came with the printer. Can’t currently check now. I have an error code 00010002
LikeLike
Unsure what version. Its what came with the printer. I have an error code now. 00010002 I might have gotten a lemon.
LikeLike
Best approach here is to try and isolate where your error is. If you’re brand new to the printer (/3D printing in general) lets try and get a successful print under your belt:
– Take a simple cube or a test model and slice it using the printer’s own software (FlashPrint)
– Copy the file using a USB stick and see if it will print
– Try sending the same file using FlashPrint to send it over the network
– Slice the file in Cura, and transfer the .gcode file using USB
– Try slicing the file in Cura and opening the resulting .gcode file in FlashPrint, then send over the network using FlashPrint)
LikeLike
When I turn it on, it goes straight to error. I can’t get passed the error so it’s dead. I’m waiting for flashforge support to reply. I did have 3 successful prints using flashprint from flashforge. After my last print, I turned it off. The next day I turned it on & instant error
LikeLike
Just an update. Cura works with the MP latest firmware, what you need to do is slice a file in flashprint that is below the min layer height (a cube that is 0.01×0.01×0.01mm) Flashprint cant slice that and will give a blank gx file that is actually .g(for now)
paste code generated from cura into template, Replace all g code and none of the funky crap up top (ONLY REPLACE CODE AND NOTHING ELSE.)
BUT, what I would recommend you do instead, and it is 100% easy to do, I did it yesterday from mp latest to flashforge latest. here is the guide:
once you convert to flashforge’s firmware you will not have any more problems with cura. or slicer, or anything for that matter….i also think octoprint might work. OH and i can calibrate E STEPS!!!!!!!! i can extrude 100mm, 200mm or 300mm of filament and adjust now, such a nice feature.
I had boughten the 0.6mm nozzle (get it btw), and for the life of me i couldnt make it work, i was using flashprint 5 with mp that only had flashprint 3. i figured out that mp does not have the update in the firmware to support the newer nozzles.
before the upgrade, i had clunking like no other, i had to up temps to 230 to get rid of it.
after update, a cool 210 at .40mm layer height and 0.72mm line width
TLDR;
go here:
follow guide, change to adventurer3 and F*** monoprice voxel
LikeLike
Hello, thanks for the info. I did the last upgrade & followed your steps. Unfortunately I got an error code 00010002 which the manufacture ended up sending me a new motherboard. I haven’t installed the new motherboard yet. I’m a little apprehensive to do the upgrade & use cura. I will install the board & decide then. Thanks for helping me.
Steve
LikeLike
Hi steve, in order to get cura working after the update to the flash forge firmware, you all need to contact flashforge for an additional program that will convert G-Code into GX code, you can also use the little trick I’ve mentioned
I have contacted them and received the tool but it states I cannot share it so I do not feel comfortable doing that. It is a very simple tool to use so I’d recommend that route. It will not work on a monoprice.
If you are referring to the actual update to The Flash forge firmware, it is because the lines to comment out have changed. I have left a comment under the name Johneyap on the Reddit post.
Essentially, download the firmware he is telling you in the instructions, and match the lines that need to be commented out to your firmware. Mine were lines 22 to 31 if I recall correctly. The lines are worded exactly the same so it’s super easy to do and don’t mind helping you out, but contact me on Reddit if you need help
LikeLike
I have a Monoprice Voxel that prints great when I don’t run into issues during the print. Frequently, my printer will randomly display the “Are you sure you want to cancel this job?” prompt and, if left open, it will eventually select yes, cancelling the job half way through. Similarly, when the printer is left on, but not yet printing, it will randomly start unloading filament. I suspect this to be directly inked to the LCD screen because both the cancel button and filament unload button are in the same area, however, it could be something else I am not thinking of. This forum might be the closest thing I have found online about MPV mid print issues, however, no one has mentioned the specifics about the cancel prompt. I don’t think it will fix the issue, but I’m about to update the firmware with the instructions above to see if it stops the problem. If that doesn’t fix it, I might swap LCD screens or disable it altogether. Any thoughts?
LikeLike
Certainly sounds like a screen issue to me. Mine is sometimes unresponsive unless you job several times, so I’m guessing they have issues over time. I suspect its an off the shelf part, so it’s probably possible to replace. This printer has a pretty decent community on Reddit under its OEM name “Adventurer 3”, so may well be worth asking over there if somebody else has done this.
LikeLike
I had a dead motherboard. Installed the new one & back in business. Afraid to try to get the cura. Don’t want to have issues again
LikeLike
Hi Andy, I have been getting an “abort file transfer” error pop up on my printer when using your adventure client also i got a successful one after trying a few time. I don’t use ethernet I use my wifi, is that why? If not then do you know why?
LikeLike
Greetings! It appears your Adventurer PC app is no longer transferring files correctly to my AD3/Voxel.
Worked okay on Voxel firmware but the latest 1.3.6 version of the Adventurer firmware from Flash Forge doesn’t like to accept ANY files over LAN – this includes Wifi and ethernet.
All I get is a “file format error” and this applies to both Cura and Flashprint files.
Adding the files via USB stick still works – unsure but it looks like something in the later firmwares broke your app. Just a heads up!
LikeLike
These are my observations on an Adventurer 3, using the latest FlashForge Firmware:
The firmware of the Flashforge Adventurer 3 seems to understand only a subset of typical marlin gcode:
-> I’ve created a bash script to convert cura gcode to flashforge gcode. I’m not sure I’ve covered all edge cases, but it seems to work.
README.md
hosted with ❤ by GitHub
This file contains hidden or bidirectional Unicode text that may be interpreted or compiled differently than what appears below. To review, open the file in an editor that reveals hidden Unicode characters.
Learn more about bidirectional Unicode characters
cura_printer_settings.cfg
hosted with ❤ by GitHub
This file contains hidden or bidirectional Unicode text that may be interpreted or compiled differently than what appears below. To review, open the file in an editor that reveals hidden Unicode characters.
Learn more about bidirectional Unicode characters
end.gcode
hosted with ❤ by GitHub
This file contains hidden or bidirectional Unicode text that may be interpreted or compiled differently than what appears below. To review, open the file in an editor that reveals hidden Unicode characters.
Learn more about bidirectional Unicode characters
start.gcode
hosted with ❤ by GitHub
This file contains hidden or bidirectional Unicode text that may be interpreted or compiled differently than what appears below. To review, open the file in an editor that reveals hidden Unicode characters.
Learn more about bidirectional Unicode characters
transform_cura_to_flashforge.sh
hosted with ❤ by GitHub
I’ve managed to use the Adv3 with Cura 5.6.0 by applying the settings and gcode converter script I’ve linked to.
LikeLike
Ooo, that’s super useful. Good work.
LikeLike
thank you very much
my friend gave a monoprice 3d printer few month ago
i really dont know how to use it. i checked alot i found your article.
its super clever that change the proflie name with .g
thankyou for sharing. it helps me alot.
Dr.dong from China 20240517
LikeLike
Has anyone figured out how to get around the file format error? I tried exporting a file as a gcode and renamed the file with .g and no change. I tried exporting a file as binary stl and renamed it with a .g and the printer accepted it but printed nothing, it calibrated and got ready but it said the print is finished as soon as it calibrated.
LikeLike